Software Manuals
Download PDFForceSeatMI
C++/C#/Python SDK for sending telemetry from any application or game to a Motion Systems platform. Reference for Unity, Unreal, Matlab and raw-API integrations.
1 General information
1.1 Introduction
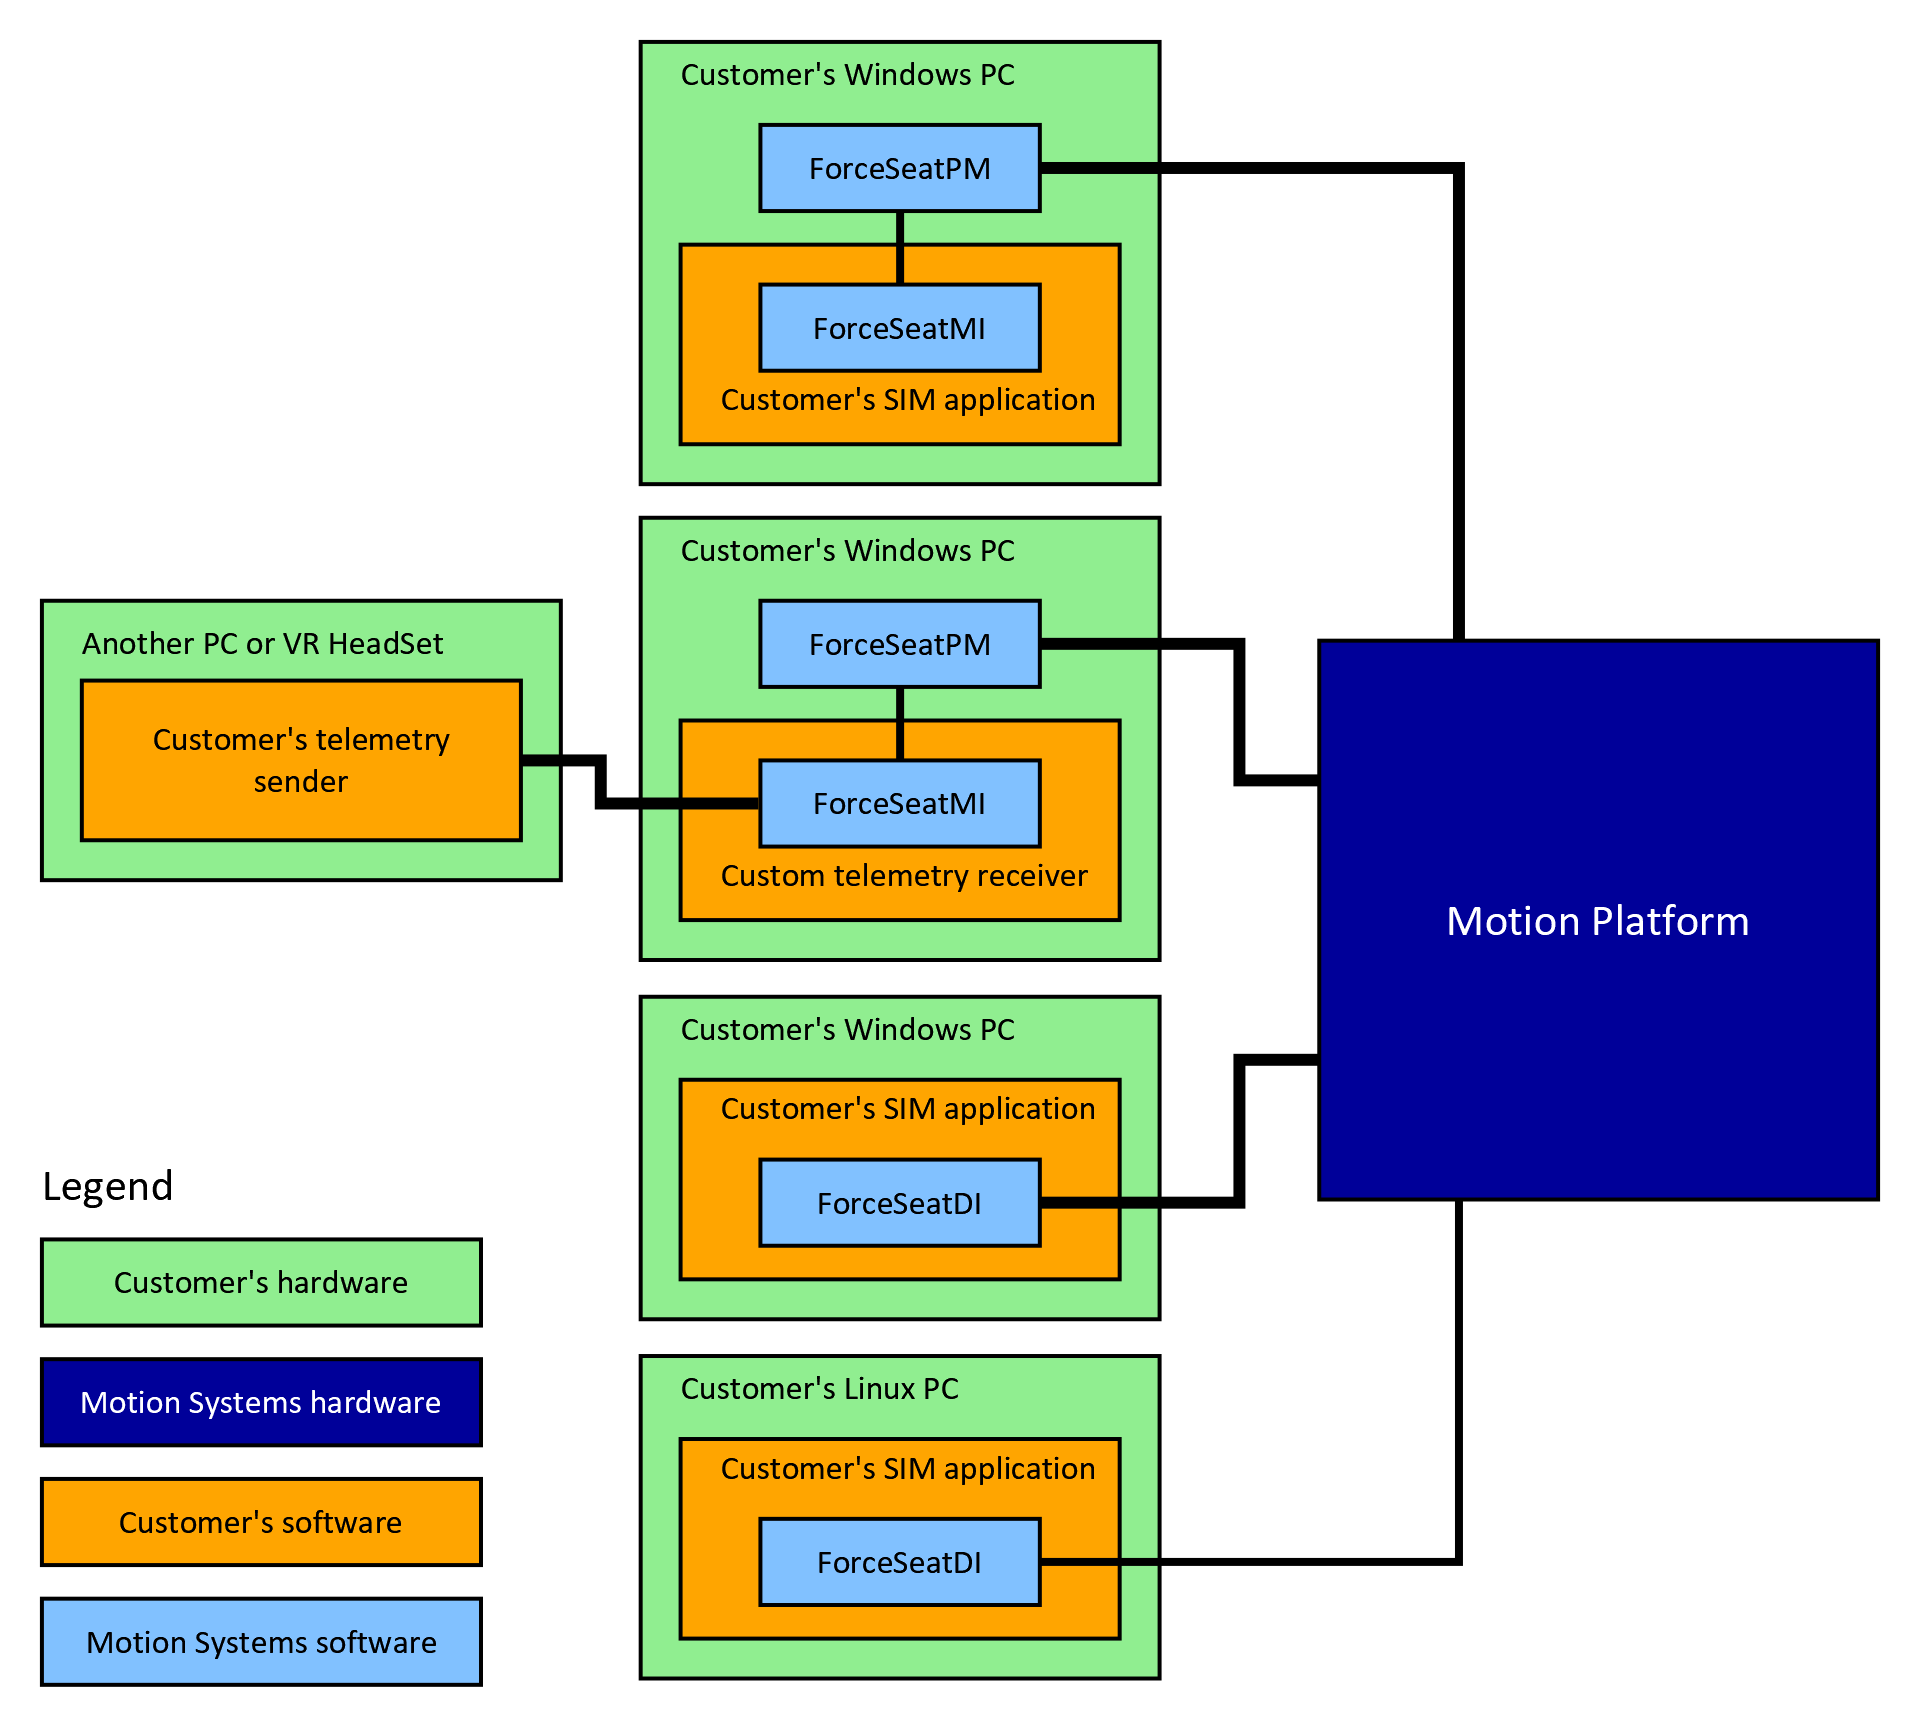
ForceSeatMI is an easy to use yet powerful interface that allows to add a motion platforms support to any application or game (referred as SIM in next sections). In most applications there is no need to control the hardware directly from the SIM. Because of that ForceSeatMI is used only to send telemetry or positioning request to ForceSeatPM. This approach delegates responsibility of transforming telemetry data to an actual platform motion from the SIM to ForceSeatPM. It also simplifies error handling that the SIM has to implement.With the latest version of the ForceSeatMI, it is possible to control the hardware with usage of Inverse Kinematics. The SIM sends required top frame position and ForceSeatPM calculates required arms (or actuators) positions. This feature can be used in application where precise positioning is required instead of forces simulation.
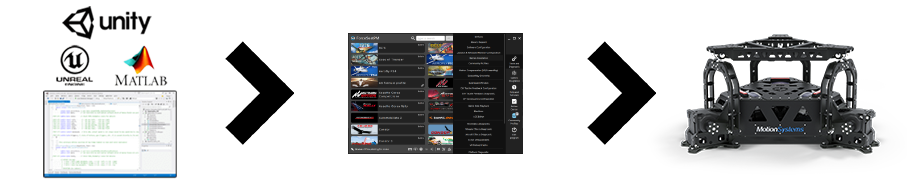
Information
This documentation applies only to ForceSeatMI 2.121 or newer. Older version of the API is not covered by this document.
ForceSeatMI 2.63+ is not backward compatible on interface and binary levels with 2.61 and previous versions. Switching from older ForceSeatMI to 2.63+ will require changes in your application source code.
1.2 Features
- SIM can choose between operation modes: telemetry (to generate sensation of forces) or top frame positioning (to precisely control top frame position)
- SIM does not have to translate telemetry data to an actual motors position - it is done by ForceSeatPM
- SIM does not depend on specific motion platform hardware, hardware related adjustments are done inside ForceSeatPM
- All diagnostic and processing features of ForceSeatPM are still available and may be used
1.3 Operation modes
ForceSeatMI works in one of modes described below. For first time users it is recommended to start from Table Position as it is the simplest example and works with built-in profile SDK - Positioning.| Mode | Description | Applications |
|---|---|---|
| Telemetry data | In this mode the SIM sends information about vehicle position, g-forces and accelerations in vehicle coordination system directly to ForceSeatPM. The whole transformation from forces to top frame movements is done inside ForceSeatPM scripting engine. It allows to easy change mapping and filter parameters without the need to change anything in the SIM. | Games and vehicle physics simulations |
| Precise table position | In this mode the SIM sends top frame position (yaw, pitch, roll, heave, sway and surge) in real world units (rad, mm). This allows the SIM to take full control over top frame position. | For applications that need better control over top frame position (e.g. equipment testing applications) |
1.4 Package content
- ForceSeatMI_Loader.c - a wrapper that forwards functions calls to real DLL (DLL is installed by ForceSeatPM)
- ForceSeatMI.cs - C# API
- ForceSeatMI_*.h - files for C/C++ API
- ForceSeatMI_*.cs - files for C# API
- ForceSeatMI_*.py - files for Python API
- Unity/*.cs - Unity 3D C# API
- Plugins/UnrealEngine - dedicated Unreal Engine plug-in with helper class for vehicle and plane telemetry extraction
- Plugins/UnrealEngine - dedicated Unreal Engine plug-in with helper class for vehicle and plane telemetry extraction
- Plugins/Matlab/Simulink - library that allows to use ForceSeatMI with Simulink® environment
- Examples - examples
Tip
ForceSeatMI uses DLL which is installed as part of the ForceSeatPM software. Make sure that you have ForceSeatPM installed on your computer.
1.5 Requirements
- Following languages and frameworks are supported out of the box: C, C++, C#, Unity 3D (C#), Unreal Engine (C++)
- Native API dll is compiled with Visual Studio 2019 - static linking with MSVC is used
- Unity 3D examples support Unity 5.x or newer
- Unreal Engine examples support Unreal Engine 4.27, 5.3, 5.4 or newer
- C# examples require at least Visual Studio 2013 Express for Windows Desktop and.NET Framework 4.0
- C/C++ examples require at least Visual Studio 2013 Express for Windows Desktop
Warning
ForceSetMI supports only Windows PC. If you wish to control the motion platform from Linux computer or VR headset, then a proxy Windows PC might be required.
1.6 Implementation details
structSize is a mandatory field which MUST be filled. It is used to handle backward/forward compatibility between DLL and the SIM.telemetry.structSize = sizeof(FSMI_TelemetryACE);mask (if it is presented) indicates what other fields are set. For example, if the SIM provides roll in FSMI_TopTablePositionPhysical structure, then mask field has to contains FSMI_POS_BIT_POSITION bit. It is required to always include state field in the mask (FSMI_POS_BIT_STATE or FSMI_TEL_BIT_STATE).
#define FSMI_POS_BIT_STATE ...#define FSMI_POS_BIT_POSITION ...#define FSMI_POS_BIT_MATRIX ...#define FSMI_POS_BIT_MAX_SPEED ...#define FSMI_POS_BIT_TRIGGERS ...#define FSMI_POS_BIT_AUX ...If ForceSeatMI is used in the SIM, the SIM has to call ForceSeatMI_BeginMotionControl at least once, otherwise there will be a paused state present all the time. After first call, you can choose how to handle pause. One option is to call ForceSeatMI_EndMotionControl and another option is to set state bit. Our recommendation is as follows:
Our recommendation is as follows:
- When the SIM enters runtime mode (it is going to send telemetry data), it calls ForceSeatMI_BeginMotionControl
- When the SIM exists runtime mode (it is not going to send telemetry data for a while), it calls ForceSeatMI_EndMotionControl
- When during runtime, there is a short pause event (e.g. user presses pause on a keyboard), the SIM should use state field
state fields consists of 8 bits, but in current version only the first bit is used.
- BIT no. 0 - 1 (FSMI_STATE_PAUSE) means that runtime mode in SIM is paused, 0 (FSMI_STATE_NO_PAUSE) means that runtime mode in SIM is running.
Tip
Remember to add FSMI_POS_BIT_STATE or FSMI_TEL_BIT_STATE to mask if state field is going to be set. Make sure to set state at least once to unpause the motion platform after ForceSeatMI_BeginMotionControl is called.
1.7 Examples provided with the SDK
Following examples are provided together with the SDK. Please make sure to use correct profile for each example.| Example | Description | Required profile |
|---|---|---|
| TablePhyPos_CPP TablePhyPos_CS TablePhyPos_Matlab TablePhyPos_Matlab_Simulink TablePhyPos_Unity TablePhyPos_Unreal | Show how to specify precise top table position by providing roll, pitch, yaw, heave, sway and surge in real world units. | SDK - Positioning |
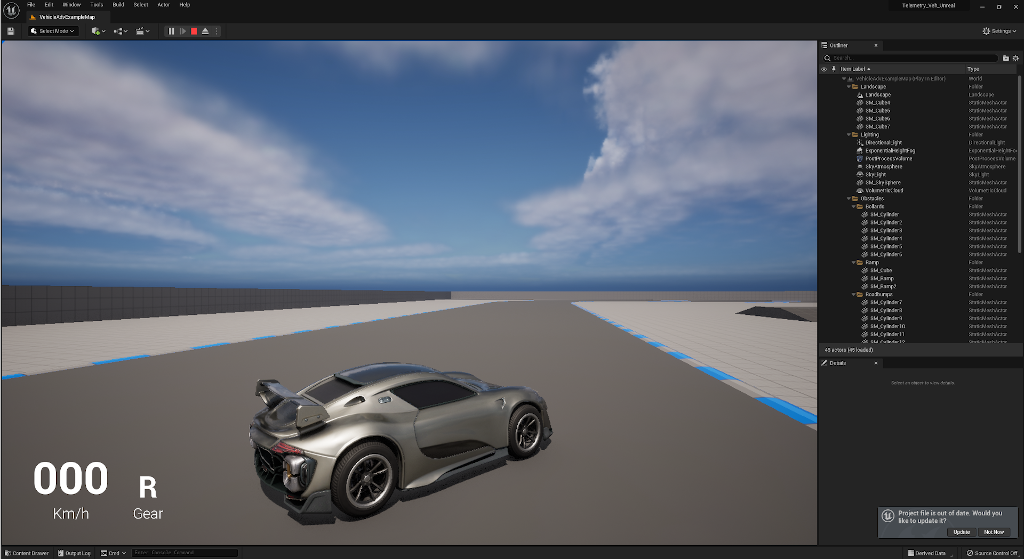
| Telemetry_Veh_Unity Telemetry_Veh_Unreal Telemetry_Matlab | Show how to send vehicle telemetry data from the SIM to ForceSeatPM. | SDK - Vehicle Telemetry ACE |
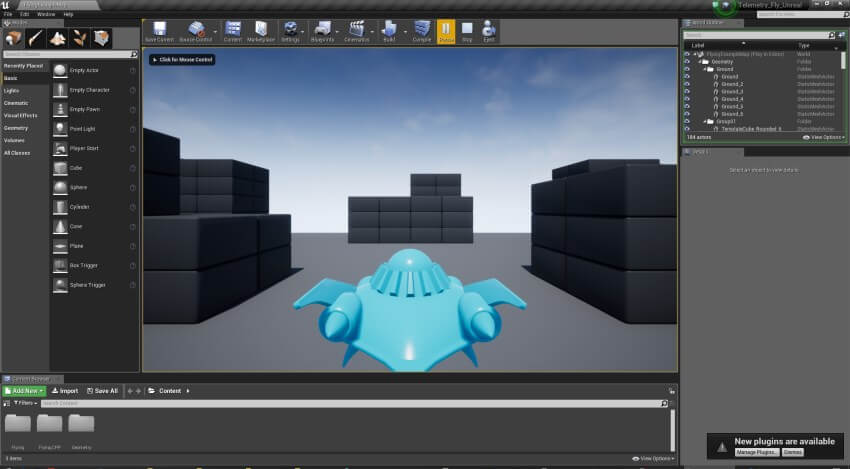
| Telemetry_Fly_Unity Telemetry_Fly_Unreal | Show how to send aeroplane telemetry data from the SIM to ForceSeatPM. | SDK - Plane Telemetry ACE |
| CSV_Acc_CPP CSV_GPS_CS CSV_RollPitch_CPP | Show how to control top table position using specify data stored in CSV file and how to reproduce input linear acceleration on the motion platform. | SDK - Positioning |
1.8 Coordinate system
In order to avoid confusion caused by different type of XYZ coordinate systems used by different applications (e.g.left-hand rule, right-hand rule, ISO 8855), ForceSeatMI uses ship motion names when applicable.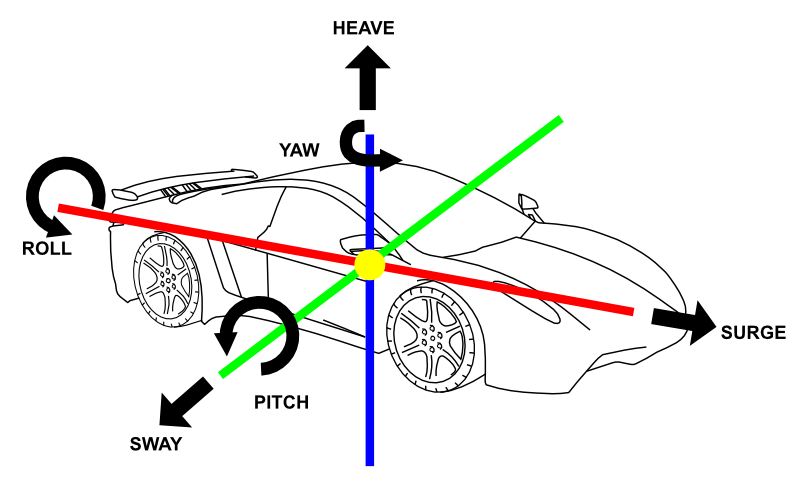
1.9 Final thoughts
- When platform does not move or the system is in pause state, then:
- Check if correct profile is active in ForceSeatPM
- Check if correct profile has been imported in ForceSeatPM (different operation modes require different profiles)
- Check ForceSeatMI diagnostic to see if ForceSeatPM receives data from the SIM.
- Check if paused indicator is on or off
- Remember to configure mask field
- Remember to set correct state value to leave pause mode.
- If you plan to use ForceSeatMI in vehicle (or plane) physics simulation application, check https://motionsystems.eu/files/Vehicle_physics_simulation_application.pdf document.
2 C/C++ projects
The ForceSeatMI can be easily used in any C/C++ x86 or x64 Windows application. You can leave loading the DLL to the operation system (conventional approach, e.g. delay loadig) or use our small loader class (recommended solution).Our loader class makes sure that even if the DLL is not found, nothing bad will happen. Basically when DLL is not loaded, all functions will return an error instead of crashing application (like it often happens in conventional approach).
2.1 Compilation and linking
Please follow below steps in order to introduce ForceSeatMI to your SIM:- Make sure that ForceSeatPM is installed in the system.
- Add directory containing ForceSeatMI_*.h files to your include paths.
- Include ForceSeatMI_Loader.c file in your project. This file contains implementation of all ForceSeatMI functions (from ForceSeatMI_Functions.h). The loader forwards function calls to real DLL or returns error code when DLL is not found. It also handles DLL loading.
- Compile and link the program.
Tip
ForceSeatMI_Loader uses DLL which is installed as part of the ForceSeatPM software.
Make sure that you have ForceSeatPM installed on your computer.
2.2 Using API object
Typical operation routine consists of following steps:- Create API handle at the beginning of the application:
api = ForceSeatMI_Create(); - When simulation starts, call:
ForceSeatMI_BeginMotionControl(api); - The SIM should send telemetry data or positioning data in constant interval using one of following functions:
ForceSeatMI_SendTelemetryACE(api, ...);ForceSeatMI_SendTopTablePosPhy(api, ...); - When simulation stops, send:
ForceSeatMI_EndMotionControl(api); - Finally when the API is no longer needed, release it:
ForceSeatMI_Delete(api);
3 C# projects
The ForceSeatMI can be easily used in any.NET application. You just need to include ForceSeatMI_*.cs files directly in your project.3.1 Compilation and linking
Please follow below steps in order to introduce ForceSeatMI to your SIM:- Make sure that ForceSeatPM is installed in the system.
- Add all ForceSeatMI_*.cs files to your project
- Compile and link the program.
Tip
ForceSeatMI C# class uses DLL which is installed as part of the ForceSeatPM software. Make sure that you have ForceSeatPM installed on your computer.
3.2 Using API object
Typical operation routine consists of following steps:- Create API handle at the beginning of the application::
C}]ForceSeatMI mi = new ForceSeatMI(); - When simulation starts, call:
C}]mi.BeginMotionControl(); - The SIM should send telemetry data or positioning data in constant interval using one of following functions:
C}]mi.SendTelemetryACE(...);mi.SendTopTablePosPhy(...); - When simulation stops, send:
C}]mi.EndMotionControl();
4 Unity 3D projects
Please follow below steps in order to include ForceSeatMI into your project.- Create Unity 3D project
- Inside Assets directory of your project create ForceSeatMI directory
- Copy following files into ForceSeatMI directory (for the reference you can check any of our Unity 3D examples)
- ForceSeatMI.cs
- ForceSeatMI_Common.cs
- ForceSeatMI_ITelemetryInterface.cs
- ForceSeatMI_Positioning.cs
- ForceSeatMI_Status.cs
- ForceSeatMI_TactileTranscuders.cs
- ForceSeatMI_Telemetry.cs
- ForceSeatMI_TelemetryACE.cs
- ForceSeatMI_Unity.cs
- ForceSeatMI_Aeroplane.cs
- ForceSeatMI_Vehicle.cs
Tip
ForceSeatMI API uses DLL which is installed as part of the ForceSeatPM software. Make sure that you have ForceSeatPM installed on your computer.
Warning
Since Unity 2022 make sure that Simulation Mode is set to Fixed Update in Physics preferences in Project Settings.
4.1 Application: position control
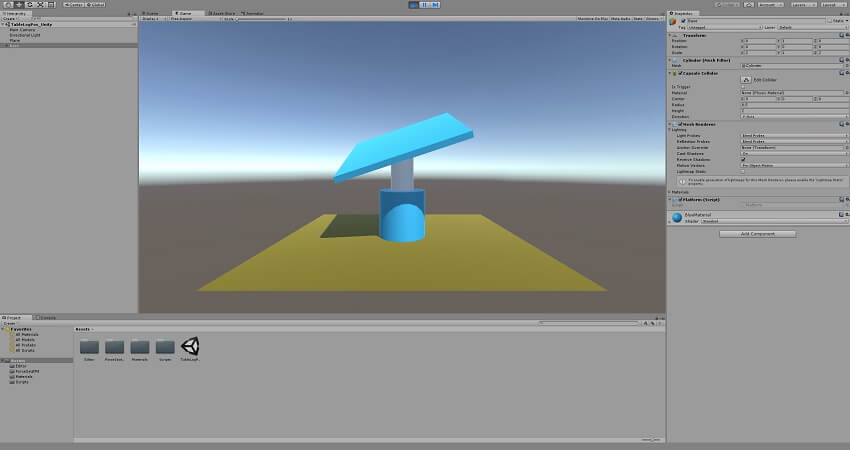
Positioning application requires usage of raw ForceSeatMI API. Typical operation routine consists of following steps:
- Import ForceSeatMI
C}]using MotionSystems; - Create an API object variable inside your class:
C}]private ForceSeatMI m_fsmi; - Initialize it in Start method:
C}]m_fsmi = new ForceSeatMI(); - If everything is loaded call:
C}]if (m_fsmi.IsLoaded()) m_fsmi.BeginMotionControl(); - The SIM should send positioning data in constant intervals using one of the following functions:
C}]m_fsmi.SendTopTablePosPhy(...); - At the end of simulation call
C}]if (m_fsmi.IsLoaded()) m_fsmi.EndMotionControl(); m_fsmi.Dispose();
4.1.1 Controls
Use the WSAD or ARROW keys to control the platform and the SPACEBAR to raise it.Below exemplary source code comes from TablePhyPos_Unity example.
C}]// FSMI apiprivate ForceSeatMI m_fsmi; // Position in physical coordinates that will be sent to the platformprivate FSMI_TopTablePositionPhysical m_platformPosition = new FSMI_TopTablePositionPhysical(); void Start () // Load ForceSeatMI library from ForceSeatPM installation directory // ForceSeatMI - BEGIN m_fsmi = new ForceSeatMI(); if (m_fsmi.IsLoaded()) // Find platform's components m_shaft = GameObject.Find("Shaft"); m_board = GameObject.Find("Board"); SaveOriginPosition(); SaveOriginRotation(); // Prepare data structure by clearing it and setting correct size m_platformPosition.mask = 0; m_platformPosition.structSize = (byte)Marshal.SizeOf(m_platformPosition); m_platformPosition.state = FSMI_State.NO_PAUSE; // Set fields that can be changed by demo application m_platformPosition.mask = FSMI_POS_BIT.STATE | FSMI_POS_BIT.POSITION; m_fsmi.BeginMotionControl(); SendDataToPlatform(); // ForceSeatMI - END else Debug.LogError("ForceSeatMI library has not been found!Please install ForceSeatPM."); void OnDestroy() // ForceSeatMI - BEGIN if (m_fsmi.IsLoaded()) m_fsmi.EndMotionControl(); m_fsmi.Dispose(); // ForceSeatMI - END private void SendDataToPlatform() // ForceSeatMI - BEGIN m_platformPosition.state = FSMI_State.NO_PAUSE; m_platformPosition.roll = Mathf.Deg2Rad * m_roll; m_platformPosition.pitch = -Mathf.Deg2Rad * m_pitch; m_platformPosition.heave = m_heave * 100; // Send data to platform m_fsmi.SendTopTablePosPhy(ref m_platformPosition); // ForceSeatMI - END 4.2 Application: vehicle simulation
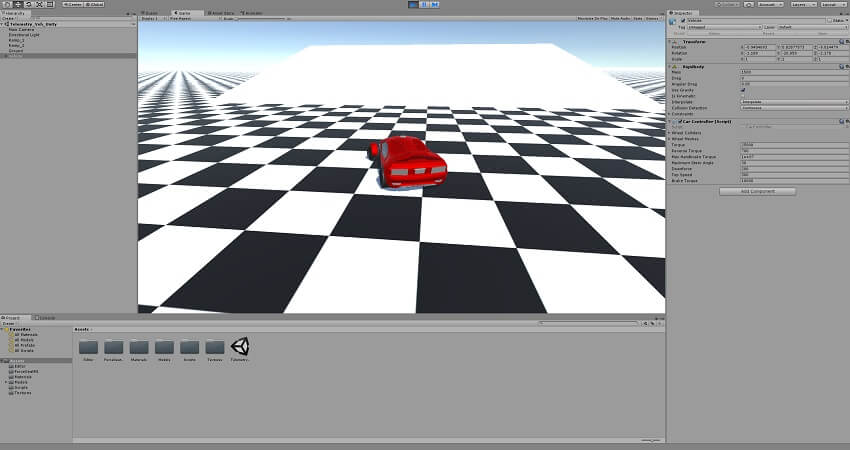
Recommended reading: https://motionsystems.eu/files/Vehicle_physics_simulation_application.pdf
For vehicle simulation application ForceSeatMI_Vehicle helper interface can be used. Typical operation routine consists of following steps:
- Create an API object variable inside your class:
C}]private ForceSeatMI_Unity m_Api;private ForceSeatMI_Vehicle m_vehicle; - Initialize it in Start method:
C}]m_Api = new ForceSeatMI_Unity();m_vehicle = new ForceSeatMI_Vehicle(m_Rigidbody) - Call:
C}]m_Api.Begin(); - The SIM should send telemetry data in constant intervals using following function:
C}]m_Api.Update(...); - At the end of simulation call
C}]m_Api.End();
4.2.1 Controls
Use the WSAD or ARROW keys to control the vehicle and SPACEBAR to use handbrake.Below exemplary source code comes from Telemetry_Veh_Unity example.
C}]private void Start() m_Rigidbody = GetComponent(); // ForceSeatMI - BEGIN m_Api = new ForceSeatMI_Unity(); m_vehicle = new ForceSeatMI_Vehicle(m_Rigidbody); m_vehicle.SetGearNumber(m_CurrentGearNumber); m_Api.SetAppID(""); // If you have dedicated app id, remove ActivateProfile calls from your code m_Api.ActivateProfile("SDK - Vehicle Telemetry ACE"); m_Api.SetTelemetryObject(m_vehicle); m_Api.Pause(false); m_Api.Begin(); // ForceSeatMI - END private void OnDestroy() // ForceSeatMI - BEGIN m_Api.End(); // ForceSeatMI - END private void Move(float steering, float accel, float footbrake, float handbrake) ... // ForceSeatMI - BEGIN if (m_vehicle != null && m_Api != null) m_vehicle.SetGearNumber(m_CurrentGearNumber); m_Api.AddExtra(m_extraParameters); m_Api.Update(Time.fixedDeltaTime); // ForceSeatMI - END 4.3 Application: flight simulation
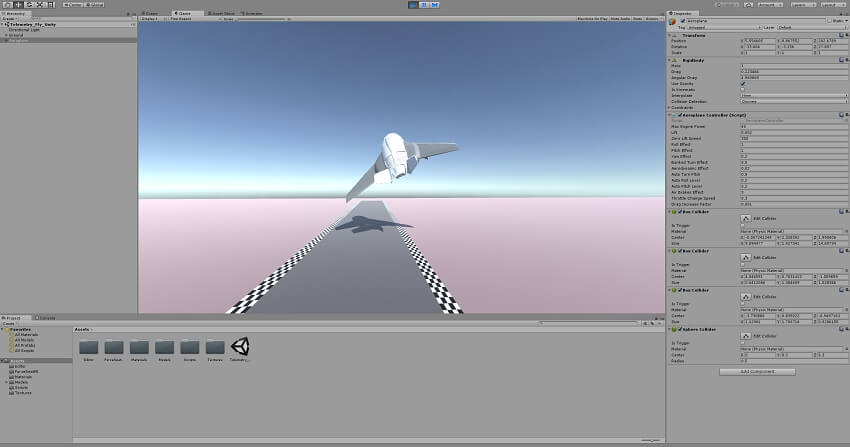
Recommended reading: https://motionsystems.eu/files/Vehicle_physics_simulation_application.pdf
For flight simulation application ForceSeatMI_UnityAeroplane helper interface can be used. Typical operation routine consists of following steps:
- Create an API object variable inside your class:
C}]private ForceSeatMI_Unity m_Api;private ForceSeatMI_Aeroplane m_aeroplane; - Initialize it in Start method:
C}]m_Api = new ForceSeatMI_Unity();m_aeroplane = new ForceSeatMI_Aeroplane(m_Rigidbody) - Call:
C}]m_Api.Begin(); - The SIM should send telemetry data in constant intervals using following function:
C}]m_Api.Update(...); - At the end of simulation call:
C}]m_Api.End();
4.3.1 Controls
Use the WSAD or ARROW keys to control the plane.Below exemplary source code comes from Telemetry_Fly_Unity example.
C}]private void Start() m_Rigidbody = GetComponent(); // ForceSeatMI - BEGIN m_Api = new ForceSeatMI_Unity(); m_aeroplane = new ForceSeatMI_Aeroplane(m_Rigidbody); m_Api.SetAppID(""); // If you have dedicated app id, remove ActivateProfile calls from your code m_Api.ActivateProfile("SDK - Plane Telemetry ACE"); m_Api.SetTelemetryObject(m_aeroplane); m_Api.Pause(false); m_Api.Begin(); // ForceSeatMI - END private void OnDestroy() // ForceSeatMI - BEGIN m_Api.End(); // ForceSeatMI - END private void FixedUpdate() ... // ForceSeatMI - BEGIN m_Api.Update(Time.fixedDeltaTime); // ForceSeatMI - END 4.4 Upgrade to newer Unity version
Samples delivered with ForceSeatMI were created in older Unity version. When newer Unity loads them, an upgrade is performed. When upgraded project is loaded into Unity first time, it usually reports an error.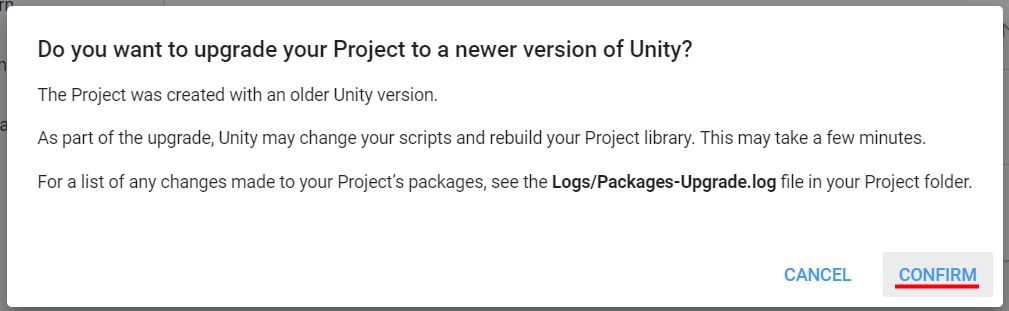
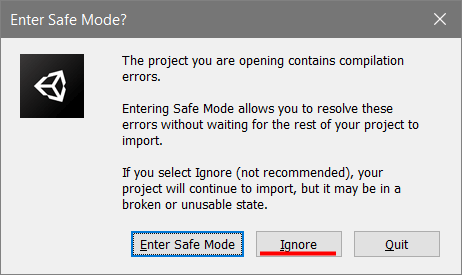
4.5 Missing 'Registry' component

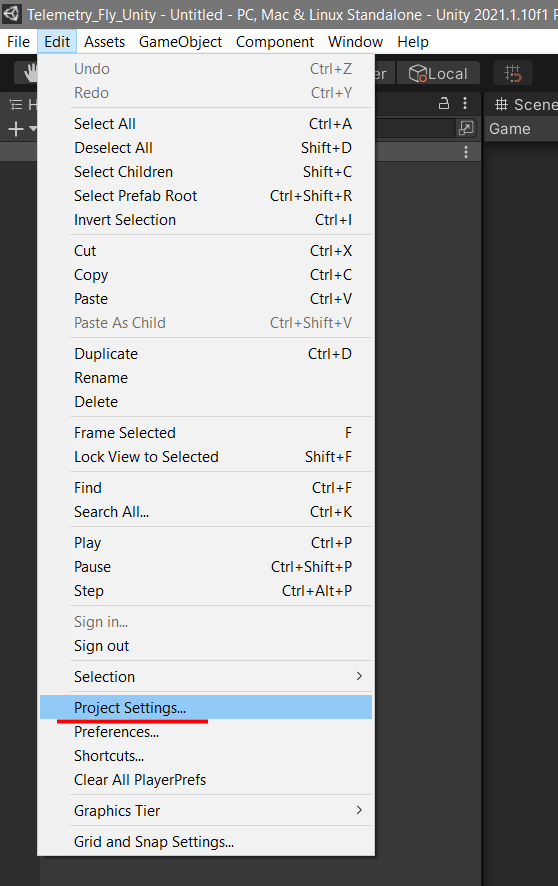
- you can remove routine that check Windows Registry to get path to ForceSeatPM installation and put hardcoded path directly in the code (not recommended)
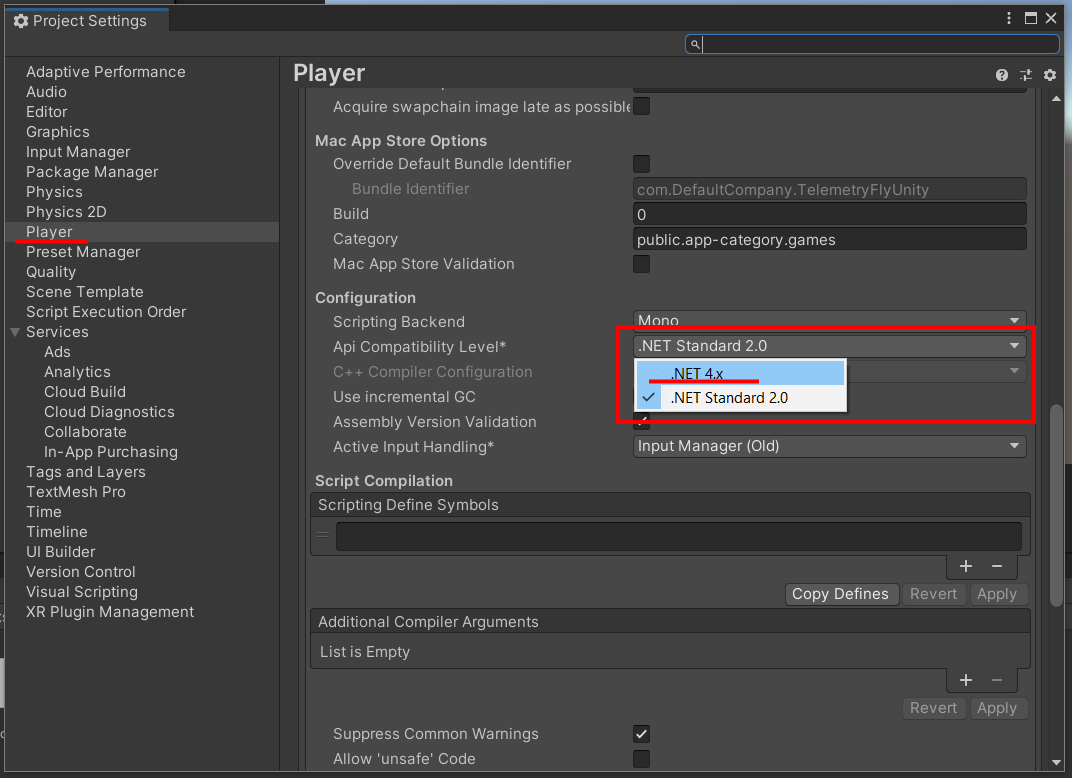
- you can switch the project to use .NET 4.x instead of NET Standard 2.0
5 Unreal Engine projects
5.1 Plugins
Information
Examples presented in this document and the plugins have been prepared to work with Unreal Engine 4.27, 5.3 and 5.4. They might not work correctly with different versions of the Unreal Engine.
Basic plugin that offers the largest set of methods to control a motion platform. With prior integration, it can be used in C++ projects as such. Integration with Blueprint projects requires an additional layer to allow graphing and control from graph blocks.
ForceSeatMIPhysXVehicle
A plugin that is designed for vehicle simulation application that uses PhysX physics engine. It offers a simplified set of functions for motion platform control. All calculations are performed internally and the user only needs to ensure that provided basic methods are called in the right places in the project. It needs ForceSeatMI plugin dependency to work properly. Can be used in Blueprint and C++ projects.
ForceSeatMIChaosVehicle
A plugin that is designed for vehicle simulation application that uses Chaos Vehicles physics engine. It offers a simplified set of functions for motion platform control. All calculations are performed internally and the user only needs to ensure that provided basic methods are called in the right places in the project. It needs ForceSeatMI plugin dependency to work properly. Can be used in Blueprint and C++ projects.
ForceSeatMIPlane
A plugin for creating simulations of flying objects. Its working principle is very similar to ForceSeatMIPhysXVehicle. The only thing the user is responsible for is calling provided functions in the appropriate places. The whole calculation is performed internally on the basis of the APawn object supplied to the plugin. It needs ForceSeatMI plugin dependency to work properly. Can be used in Blueprint and C++ projects.
MotionCueingInterface
MotionSystems' implementation of Motion Cueing Interface (originally created by Sebastien Loze and Francis Maheux). It needs ForceSeatMI plugin dependency and can be used in Blueprint projects.
For more information please visit
https://github.com/ue4plugins/MotionCueingInterface
5.2 Integration
5.2.1 Blueprint
In order to use the plugins in your projects, it is necessary to take some important integration steps. For Blueprint projects, all you need to do is:- Inside root directory of your project create Plugins directory
- Copy ForceSeatMI plugin folder into Plugins directory
- Copy other plugin folders if you want to use them in your project
- Add specific Controller to your Blueprint object and create control graphs
Tip
ForceSeatMI plugin uses DLL which is installed as part of the ForceSeatPM software. Make sure that you have ForceSeatPM installed on your computer.
5.2.2 C++
For C++ projects, the integration looks a little different:- Inside root directory of your project create Plugins directory
- Copy ForceSeatMI plugin folder into Plugins directory
- Copy other plugin folders if you want to use them in your project
- Add ForceSeatMI plugin (and others if used) dependency to your project inside YourProject.Build.cs
C}]PublicDependencyModuleNames.AddRange(new string[] { "Core", "CoreUObject","Engine", "InputCore", "PhysXVehicles", "HeadMountedDisplay","ForceSeatMI", "ForceSeatMIPhysXVehicle" });
Tip
ForceSeatMI plugin uses DLL which is installed as part of the ForceSeatPM software. Make sure that you have ForceSeatPM installed on your computer.
5.3 Automatic profile activation
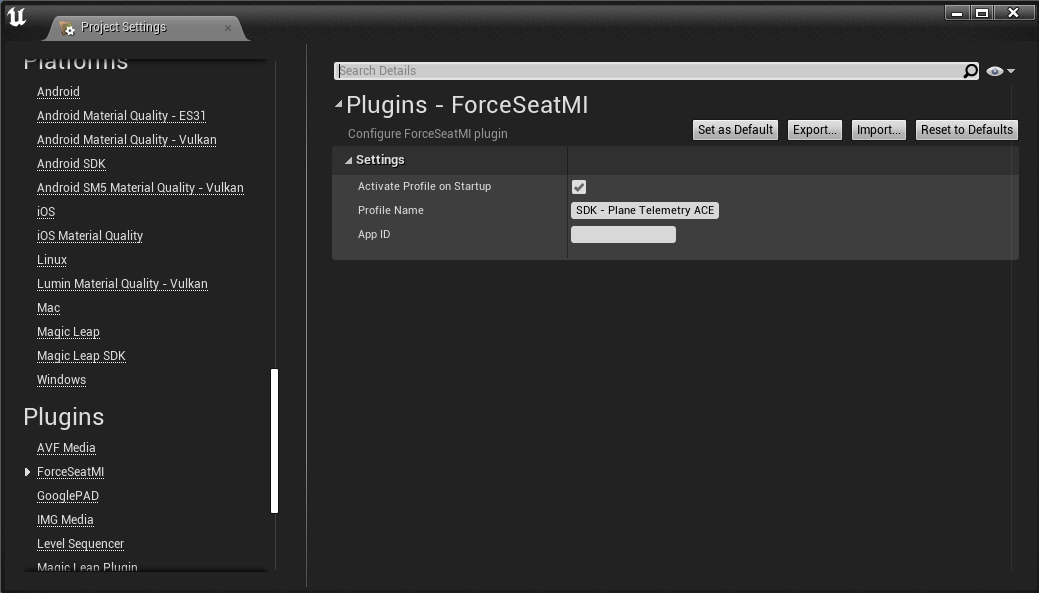
For the most realistic feel and experience, ForceseatPM software offers a set of built-in profiles that support various games and applications. It is very important to choose the right profile that fits your application.In case of using ForceSeatMI plugin, the plugin can automatically activate configured profile on start-up (this features is enabled by default). You can provide name of the profile in your projects settings, in ForceSeatMI plugin section.
Tip
Profile name provided in project settings takes precedence over the default hardcoded profile name used internally by various ForceSeatMI components.
If you are providing AppID, make sure that Activate Profile on Startup is DISABLED.
If you are providing AppID, make sure that Activate Profile on Startup is DISABLED.
5.3.1 Absolute path length
In the latest versions of the Unreal Engine it is important to remember that the project path should not be larger than 260 characters as this may cause unexpected errors with the MSVC toolchain.Warning
Make sure the project absolute path is less than 260 characters long.
5.4 Application: top table positioning (C++)
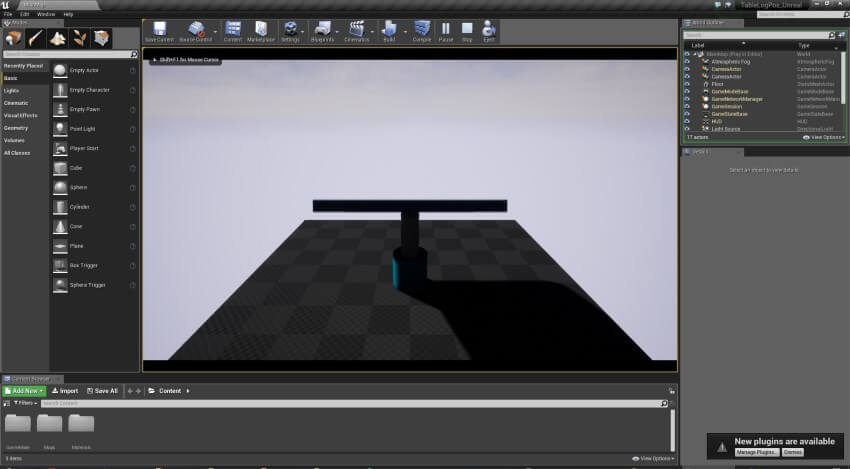
Positioning application requires usage of raw ForceSeatMI API. Typical operation routine consists of following steps:
- Inside root directory of your project create Plugins directory
- Copy ForceSeatMI plugin folder into Plugins directory
- Add ForceSeatMI plugin (and others if used) dependency to your project inside YourProject.Build.cs
C}]PublicDependencyModuleNames.AddRange(new string[] { "Core", "CoreUObject","Engine", "InputCore", "PhysXVehicles", "HeadMountedDisplay", "ForceSeatMI" }); - Create a pointer member variable inside your class which will point to an instance of IForceSeatMI_API:
IForceSeatMI_API* Api; - Initialize it to null value in class constructor:
Api(nullptr) - When simulation starts (BeginPlay() method of your APawn implementation) create API object. Default name SDK - Positioning will be replaced with the profile name from the plugin settings if available (check Profile acivation section for more details):
Api = IForceSeatMI::Get().CreateAPI("SDK - Positioning"); - Initiate motion platform control by calling:
Api->BeginMotionControl(); - The SIM should send positioning data in constant intervals using one of the following functions
Api->SendTopTablePosPhy(...); - At the end of simulation call:
Api->EndMotionControl();
ATablePhyPos_UnrealPawn::ATablePhyPos_UnrealPawn() // ... generated UE4 code removed for better clarity , Api(nullptr) // ... generated UE4 code removed for better clarity // ForceSeatMI - BEGIN memset(&PlatformPosition, 0, sizeof(PlatformPosition)); PlatformPosition.structSize = sizeof(PlatformPosition); PlatformPosition.maxSpeed = PLATFORM_MAX_SPEED; PlatformPosition.mask = FSMI_POS_BIT_STATE | FSMI_POS_BIT_POSITION | FSMI_POS_BIT_MAX_SPEED; // ForceSeatMI - END void ATablePhyPos_UnrealPawn::Tick(float DeltaTime) // ... generated UE4 code removed for better clarity // ForceSeatMI - BEGIN SendCoordinatesToPlatform(); // ForceSeatMI - END void ATablePhyPos_UnrealPawn::BeginPlay() Super::BeginPlay(); // ForceSeatMI - BEGIN delete Api; Api = IForceSeatMI::Get().CreateAPI("SDK - Positioning"); if (Api) Api->BeginMotionControl(); SendCoordinatesToPlatform(); // ForceSeatMI - END // ... generated UE4 code removed for better clarity void ATablePhyPos_UnrealPawn::EndPlay(const EEndPlayReason::Type EndPlayReason) Super::EndPlay(EndPlayReason); // ForceSeatMI - BEGIN if (Api) Api->EndMotionControl(); // ForceSeatMI - END void ATablePhyPos_UnrealPawn::SendCoordinatesToPlatform() // ForceSeatMI - BEGIN if (Api) PlatformPosition.state = FSMI_STATE_NO_PAUSE; PlatformPosition.roll = CurrentDrawingRoll; PlatformPosition.pitch = -CurrentDrawingPitch; PlatformPosition.heave = CurrentDrawingHeave; Api->SendTopTablePosPhy(&PlatformPosition); // ForceSeatMI - END 5.5 Application: top table positioning (Blueprint)
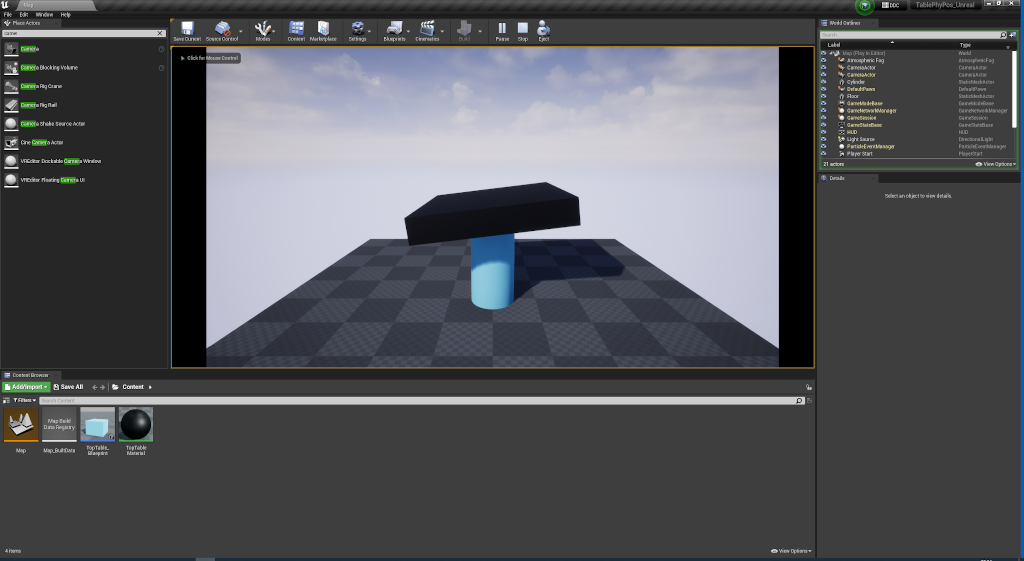
Positioning application in blueprint version requires usage of ForceSeatMI_API_BP. Typical operation routine consists of following steps:
- Create blueprint project
- Inside root directory of your project create Plugins directory
- Copy ForceSeatMI plugin folder into Plugins directory
- Find and open pawn blueprint
- On Components tab click +Add and add ForceSeatMI_API_BP object
- Use right mouse button on the blueprint to add new graph element and type Update in the Search box
- Select ForceSeatMI_API_BP from the list
- Use right mouse button on the blueprint to add new graph element and type Make TopTablePositionPhysicalBP in the Search box
- Select Make TopTablePositionPhysicalBP from the list
- Connect all necessary links and you are ready to go
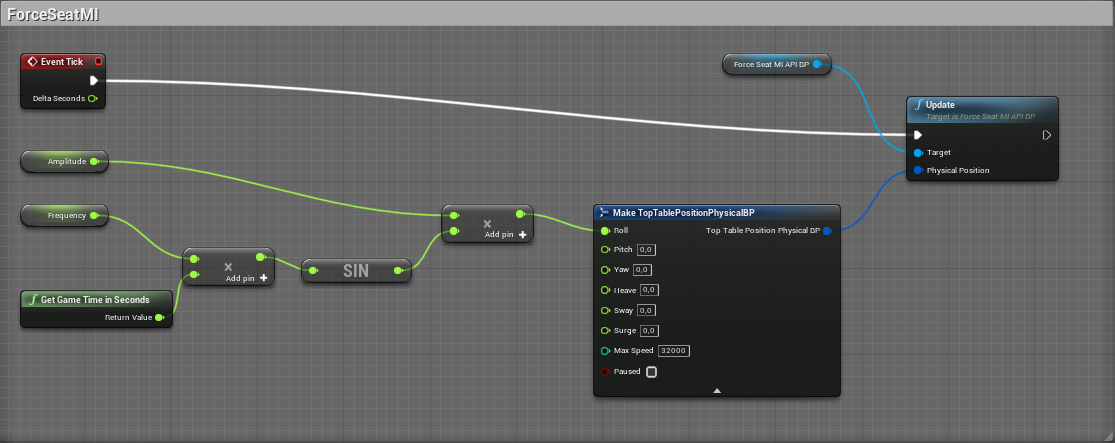
5.6 Application: vehicle simulation (PhysX, C++)
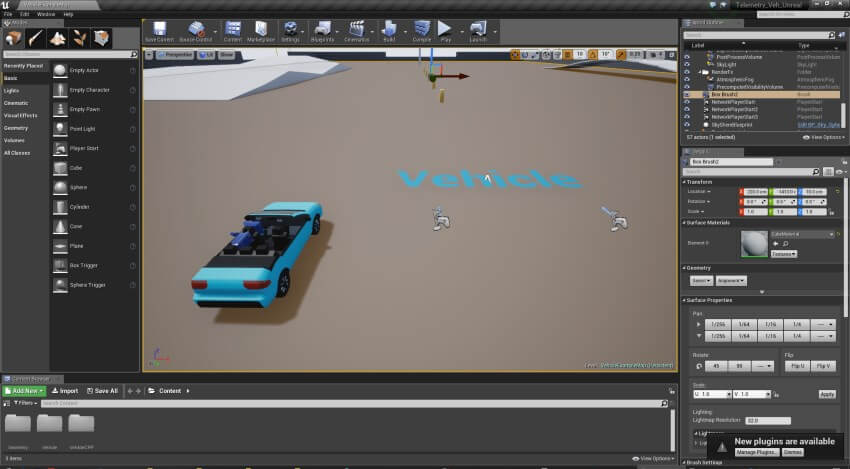
Recommended reading: https://motionsystems.eu/files/Vehicle_physics_simulation_application.pdf
Vehicle simulation application requires PhysXVehicles and extracts automatically all necessary data from APawn and UWheeledVehicleMovementComponent objects.
Typical operation routine consists of following steps:
- Inside root directory of your project create Plugins directory
- Copy ForceSeatMI plugin folder into Plugins directory
- Copy ForceSeatMIPhysXVehicle plugin folder into Plugins directory
- Add ForceSeatMI plugin dependency to your project inside YourProject.Build.cs
C}]PublicDependencyModuleNames.AddRange(new string[] { "Core", "CoreUObject","Engine", "InputCore", "PhysXVehicles", "HeadMountedDisplay","ForceSeatMI", "ForceSeatMIPhysXVehicle" }); - Create a pointer to instance of IForceSeatMIPhysXVehicle_ControllerCore:
IForceSeatMIPhysXVehicle_ControllerCore* Controller; - Initialize it to null value in class constructor:
Controller(nullptr) - At start-up (BeginPlay() method of your APawn implementation) create Controller object:
Controller = ForceSeatMIPhysXVehicle::Get().CreateControllerCore(this); - Initiate motion platform control by calling:
Controller->Pause(false);Controller->Begin(); - The SIM should send telemetry data in constant intervals using the following function:
Controller->AddExtraTransformation(ExtraTransformation);Controller->Update(Delta); - At the end of simulation call:
Controller->End();
ATelemetry_Veh_UnrealPawn::ATelemetry_Veh_UnrealPawn() : Controller(nullptr) // ... generated UE4 code removed for better clarity void ATelemetry_Veh_UnrealPawn::Tick(float Delta) Super::Tick(Delta); // ... generated UE4 code removed for better clarity ++Iterator; // ForceSeatMI - BEGIN // Use extra parameters to generate custom effects, for exmp. vibrations. They will NOT be // filtered, smoothed or processed in any way. ExtraTransformation.yaw = 0; ExtraTransformation.pitch = 0; ExtraTransformation.roll = 0; ExtraTransformation.right = 0; ExtraTransformation.up = 0; ExtraTransformation.forward = 0; if (Controller) Controller->AddExtraTransformation(ExtraTransformation); Controller->Update(Delta); // ForceSeatMI - END void ATelemetry_Veh_UnrealPawn::BeginPlay() Super::BeginPlay(); Iterator = 0; // ForceSeatMI - BEGIN delete Controller; Controller = ForceSeatMIPhysXVehicle::Get().CreateControllerCore(this); if (Controller) Controller->Pause(false); Controller->Begin(); // ForceSeatMI - END 5.7 Application: vehicle simulation (PhysX, Blueprint)
Recommended reading: https://motionsystems.eu/files/Vehicle_physics_simulation_application.pdf
Vehicle simulation application requires PhysXVehicles and extracts automatically all necessary data from AWheeledVehicle object.
Typical operation routine consists of following steps:
- Create blueprint vehicle project
- Inside root directory of your project create Plugins directory
- Copy ForceSeatMI plugin folder into Plugins directory
- Copy ForceSeatMIPhysXVehicle plugin folder into Plugins directory
- Find and open vehicle (pawn) blueprint
- On Components tab click +Add Component and add ForceSeatMIPhysXVehicle_Controller object
- Use right mouse button on the blueprint to add new graph element and type Set vehicle object in the Search box
- Select Set Vehicle Object(ForceSeatMIPhysXVehicle_Controller) from the list
- Connect Event Tick block to Exec
- Connect Self to Input
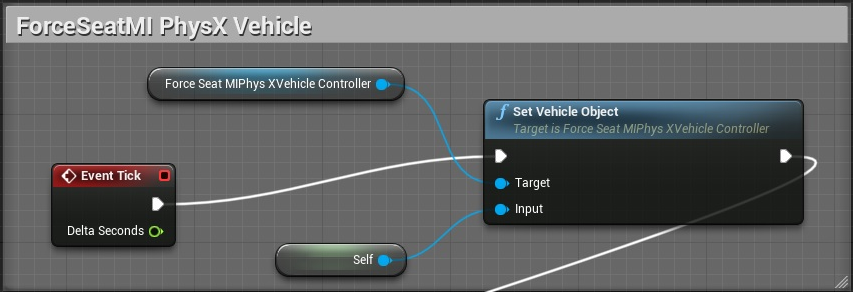
5.8 Application: vehicle simulation (Chaos, Blueprint)
Recommended reading: https://motionsystems.eu/files/Vehicle_physics_simulation_application.pdf
Vehicle simulation application requires ChaosVehiclesPlugin and extracts automatically all necessary data from AWheeledVehiclePawn object.
Typical operation routine consists of following steps:
- Create blueprint Chaos vehicle project
- Inside root directory of your project create Plugins directory
- Copy ForceSeatMI plugin folder into Plugins directory
- Copy ForceSeatMIChaosVehicle plugin folder into Plugins directory
- Find and open vehicle (pawn) blueprint
- On Components tab click +Add and add ForceSeatMIChaosVehicle_Controller object
- Use right mouse button on the blueprint to add new graph element and type Set vehicle object in the Search box
- Select Set Vehicle Object(ForceSeatMIChaosVehicle_Controller) from the list
- Connect Event Tick block to Exec
- Connect Self to Input
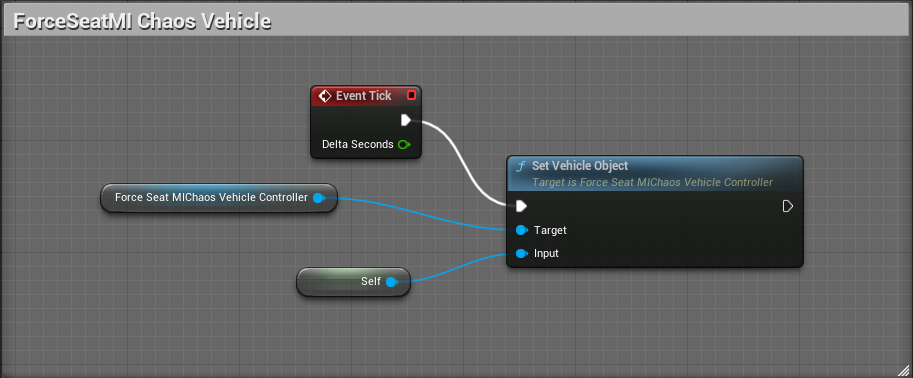
5.9 Application: flight simulation (C++)
Recommended reading: https://motionsystems.eu/files/Vehicle_physics_simulation_application.pdf
Typical operation routine consists of following steps:
- Add ForceSeatMI plugin dependency to your project inside YourProject.Build.cs
C}]PublicDependencyModuleNames.AddRange(new string[] { "Core", "CoreUObject","Engine", "InputCore", "ForceSeatMI", "ForceSeatMIPlane" }); - Inside root directory of your project create Plugins directory
- Copy ForceSeatMI plugin folder into Plugins directory
- Copy ForceSeatMIPlane plugin folder into Plugins directory
- Create a pointer member variable inside your class which will point to an instance of IForceSeatMIPlane_ControllerCore:
IForceSeatMIPlane_ControllerCore* Controller; - Initialize it to null value in class constructor:
Controller(nullptr) - When simulation starts (BeginPlay() method of your APawn implementation) create Controller object:
Controller = ForceSeatMIPlane::Get().CreateControllerCore(this); - Initiate motion platform control by calling:
Controller->Pause(false);Controller->Begin(); - The SIM should send telemetry data in constant intervals using the following function:
Controller->AddExtraTransformation(ExtraTransformation);Controller->Update(DeltaSeconds); - At the end of simulation call:
Controller->End();
void ATelemetry_Fly_UnrealPawn::Tick(float DeltaSeconds) // ... generated UE4 code removed for better clarity Super::Tick(DeltaSeconds); // ForceSeatMI - BEGIN // Use extra parameters to generate custom effects, for exmp. vibrations. They will NOT be // filtered, smoothed or processed in any way. ExtraTransformation.yaw = 0; ExtraTransformation.pitch = 0; ExtraTransformation.roll = 0; ExtraTransformation.right = 0; ExtraTransformation.up = 0; ExtraTransformation.forward = 0; if (Controller) Controller->AddExtraTransformation(ExtraTransformation); Controller->Update(DeltaSeconds); // ForceSeatMI - END void ATelemetry_Fly_UnrealPawn::BeginPlay() Super::BeginPlay(); Iterator = 0; // ForceSeatMI - BEGIN delete Controller; Controller = ForceSeatMIPlane::Get().CreateControllerCore(this); if (Controller) Controller->Pause(false); Controller->Begin(); // ForceSeatMI - END 5.10 Application: flight simulation (Blueprint)
Recommended reading: https://motionsystems.eu/files/Vehicle_physics_simulation_application.pdf
Typical operation routine consists of following steps:
- Create blueprint plane project
- Inside root directory of your project create Plugins directory
- Copy ForceSeatMI plugin folder into Plugins directory
- Copy ForceSeatMIPlane plugin folder into Plugins directory
- Find and open plane (flying pawn) blueprint
- On Components tab click +Add and add ForceSeatMIPlane_Controller object
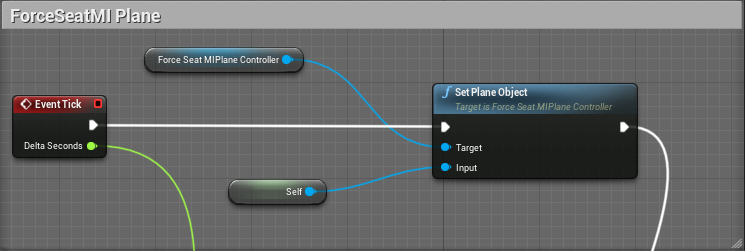
- Use right mouse button on the blueprint to add new graph element and type Set plane object in the Search box
- Select Set Vehicle Object(ForceSeatMIPlaneVehicle_Controller) from the list
- Connect Event Tick block to Exec
- Connect Self to Input
5.11 Application: vehicle and flight simulation (Motion Cueing Interface, Blueprint)
MCI examples use MotionSystems' implementation of Motion Cueing Interface developed originally by Sebastien Loze and Francis Maheux. For more information please visit:https://github.com/ue4plugins/MotionCueingInterface
Examples:
MCI_Veh_Unreal_BP (use built-in ForceSeatPM profile SDK - Vehicle Telemetry ACE)
MCI_Fly_Unreal_BP (use built-in ForceSeatPM profile SDK - Plane Telemetry ACE)
Recommended reading: https://motionsystems.eu/files/Vehicle_physics_simulation_application.pdf
Typical operation routine consists of following steps:
- Create blueprint project
- Inside root directory of your project create Plugins directory
- Copy ForceSeatMI plugin folder into Plugins directory
- Copy MotionCueingInterface plugin folder into Plugins directory
- Find and open pawn blueprint
- On Components tab click +Add Component and add Motion Probe object
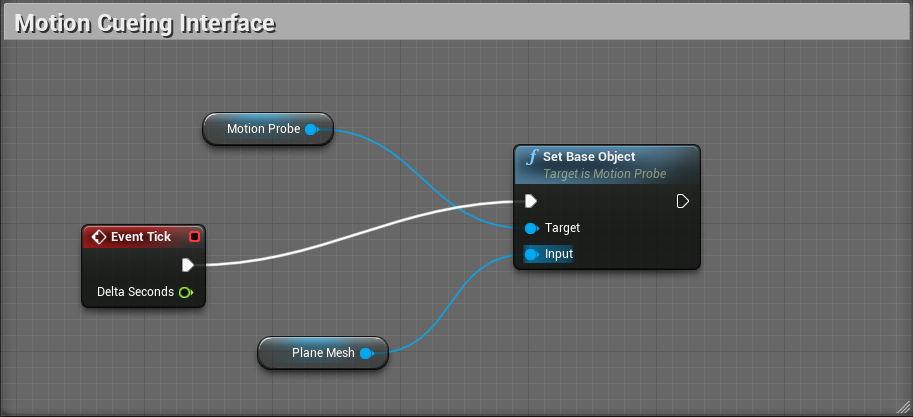
- Use right mouse button on the blueprint to add new graph element and type Set base object in the Search box
- Select Set Base Object (Motion Probe) from the list
- Connect Event Tick block to Exec
- Connect Mesh to Input
6 Matlab® and Simulink®
6.1 Introduction
This is not (only) a game anymore! From now on you can use your favorite motion platform with Matlab® (R2019 and R2020 version) programming environment. Math, algorithms, signal processing, building and modeling advanced motion systems - all of those can be achieved with the use of the real machine. Size does not matter! All our products are ready to work with the latest version of Matlab® and Simulink® applications.Tip
A number of MathWorks products require that you have a third-party compiler installed on your system. The compiler is also required to work with MEX files. Make sure that you have the correct version of compiler installed before you start using ForceSeatDI and/or ForceSeatMI.
6.2 ForceSeatDI and ForceSeatMI
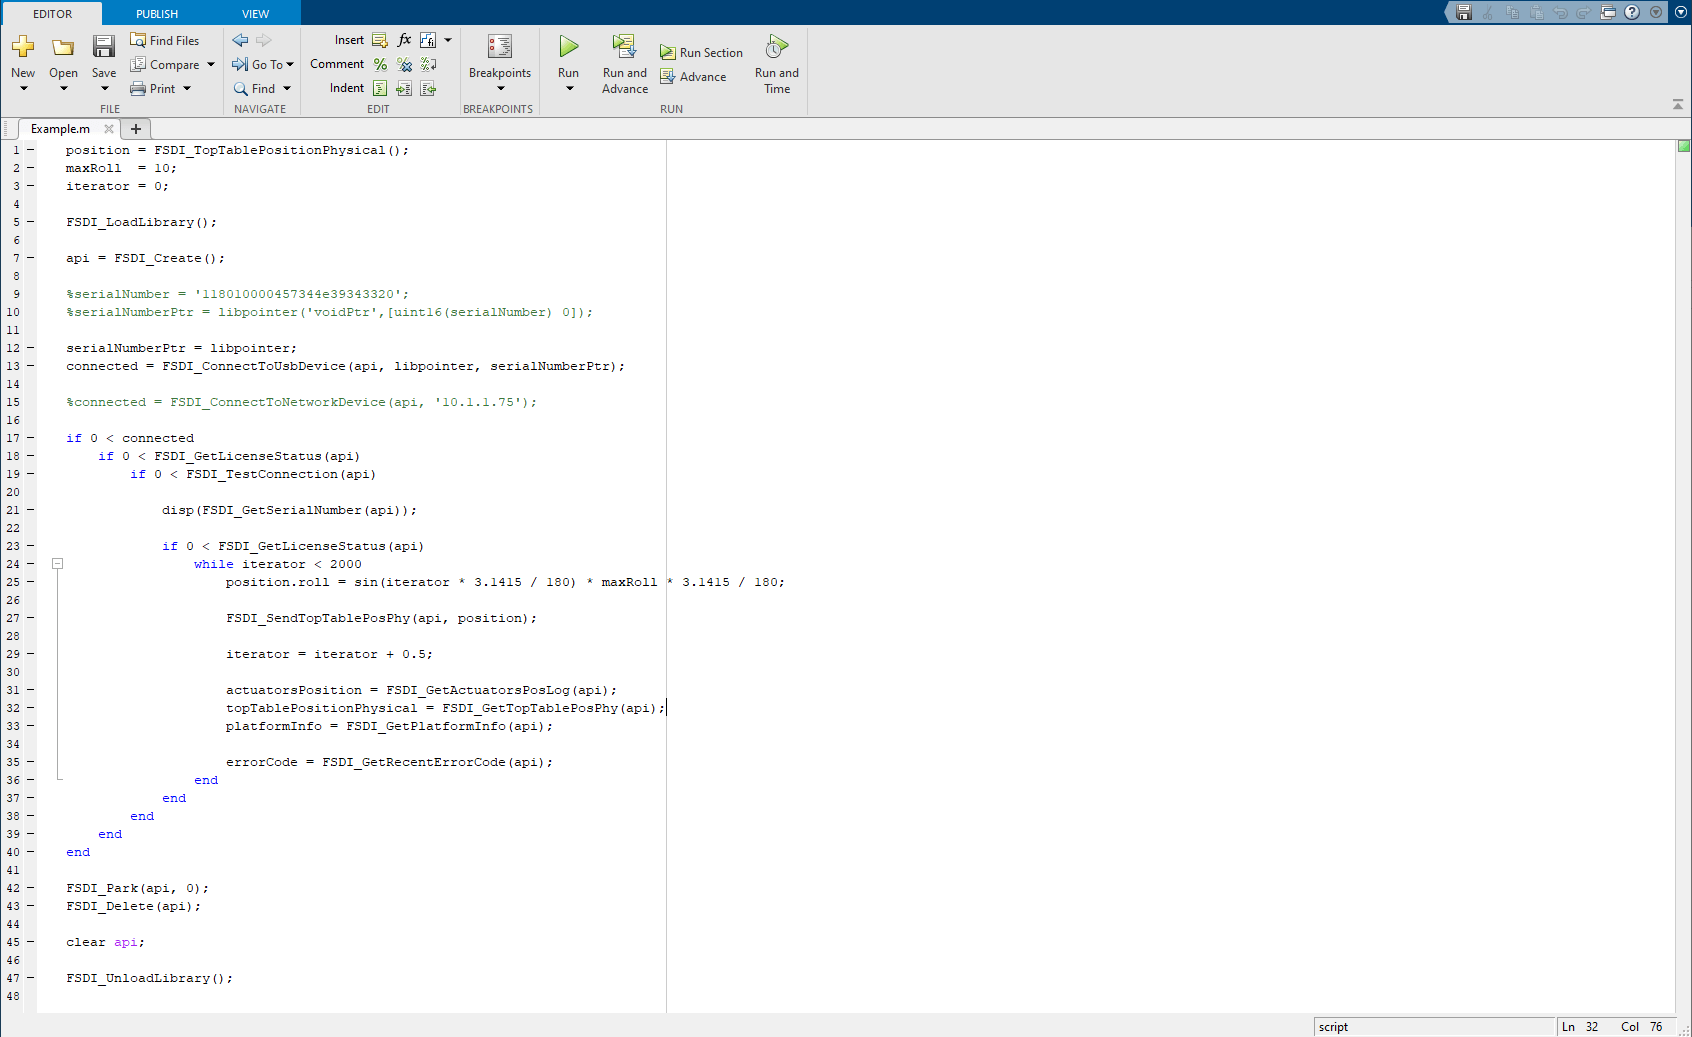
As a company we provide two APIs to work with our machines. Both of them can be used with Matlab® and Simulink®. It is on your preferences what way would you like to choose. The general idea that stays behind them is the same - to minimize the end user's effort required to control the motion platform. We strongly believe that our customers time is one of the most important values. That's why we put a lot of effort to make things as smooth and intuitive as they can be.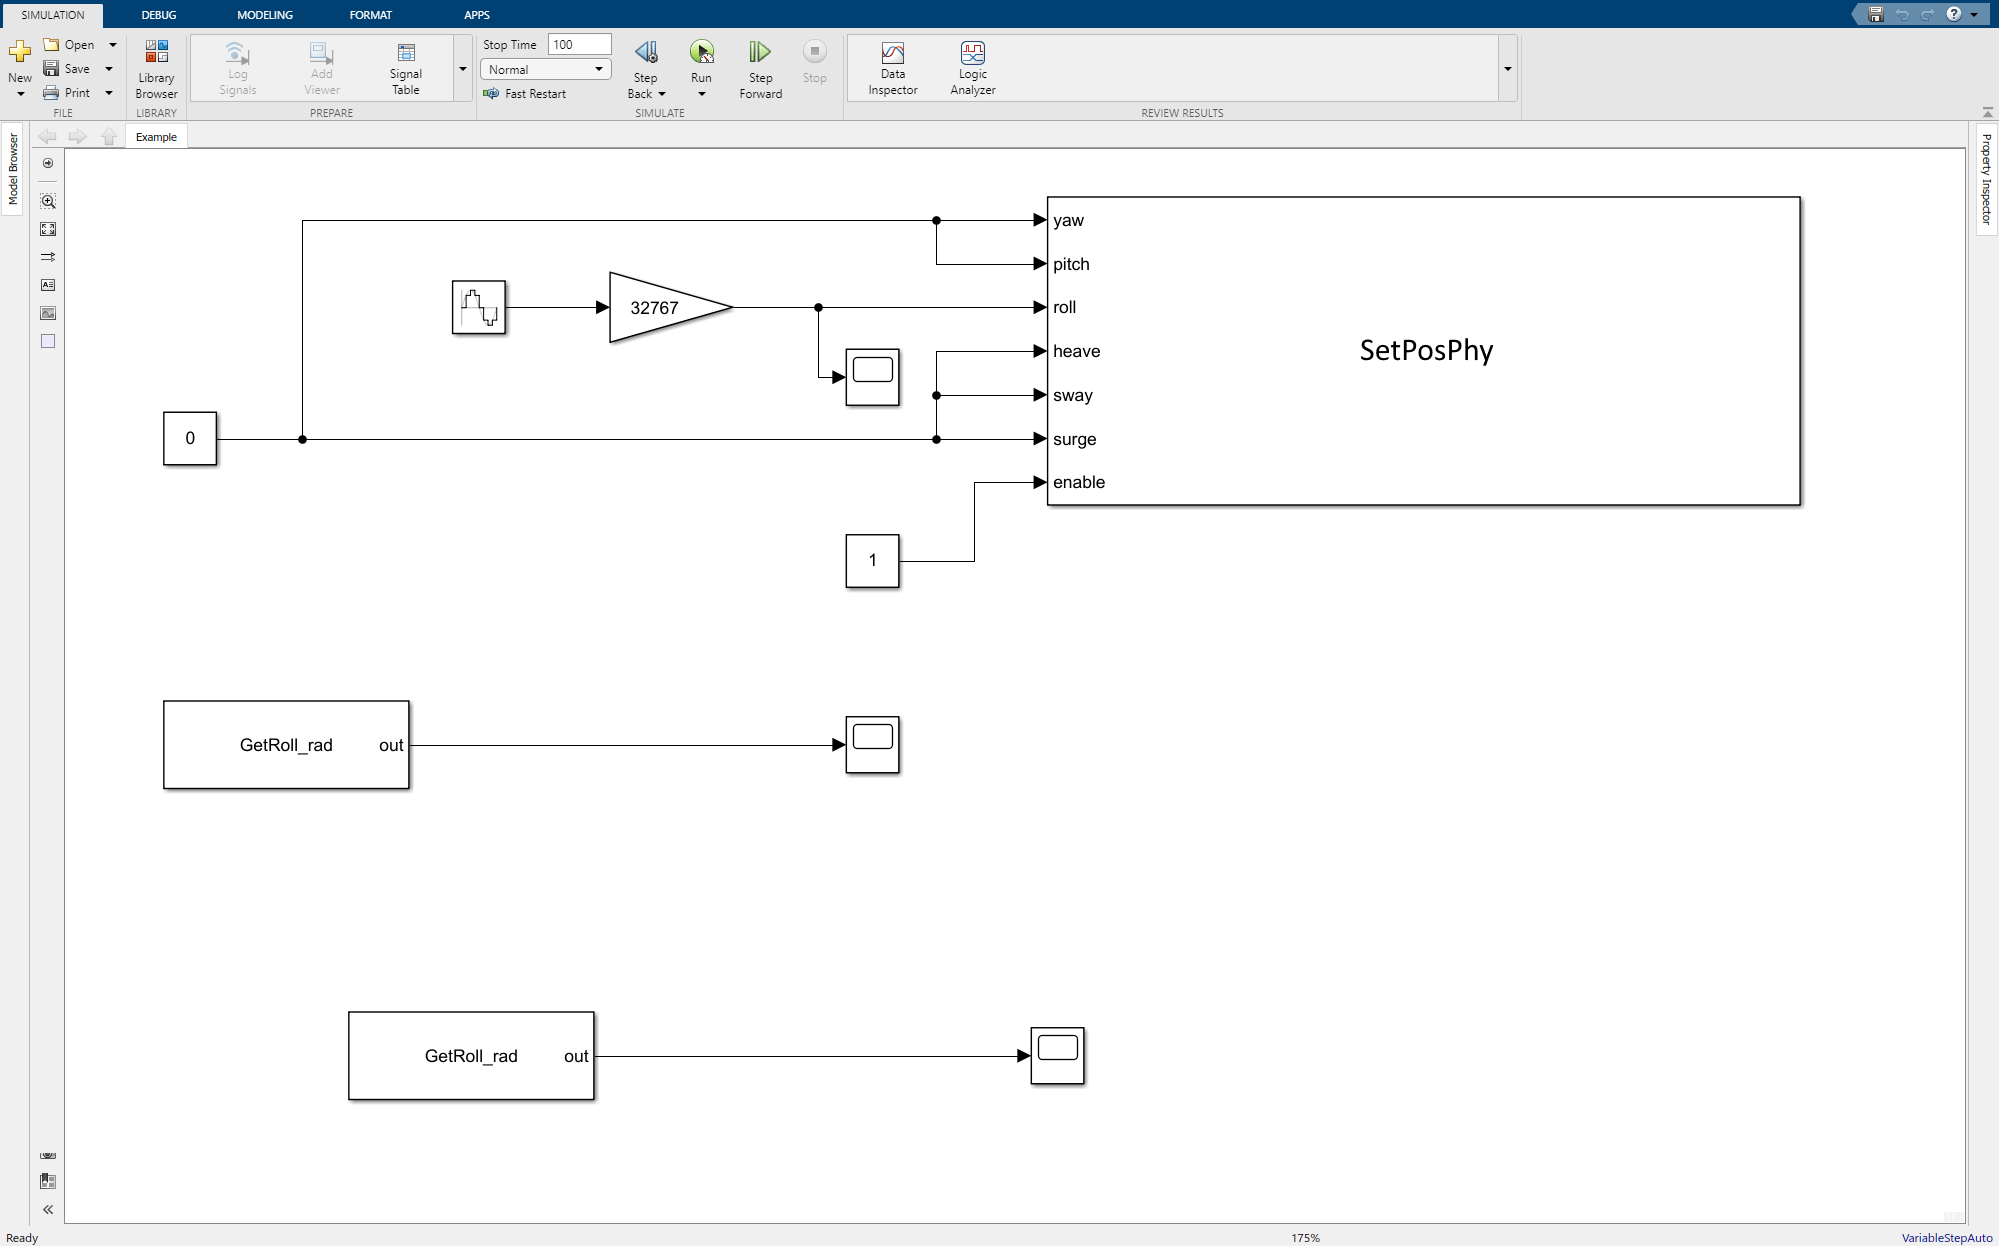
6.3 Simulink® library configuration
Launch Matlab® application and set up path to Simulink® compatible plugins provided by our team. The plugin can be found in ForceSeatMI/ForceSeatDI archive, in plugins/Matlab/Simulink sub directory.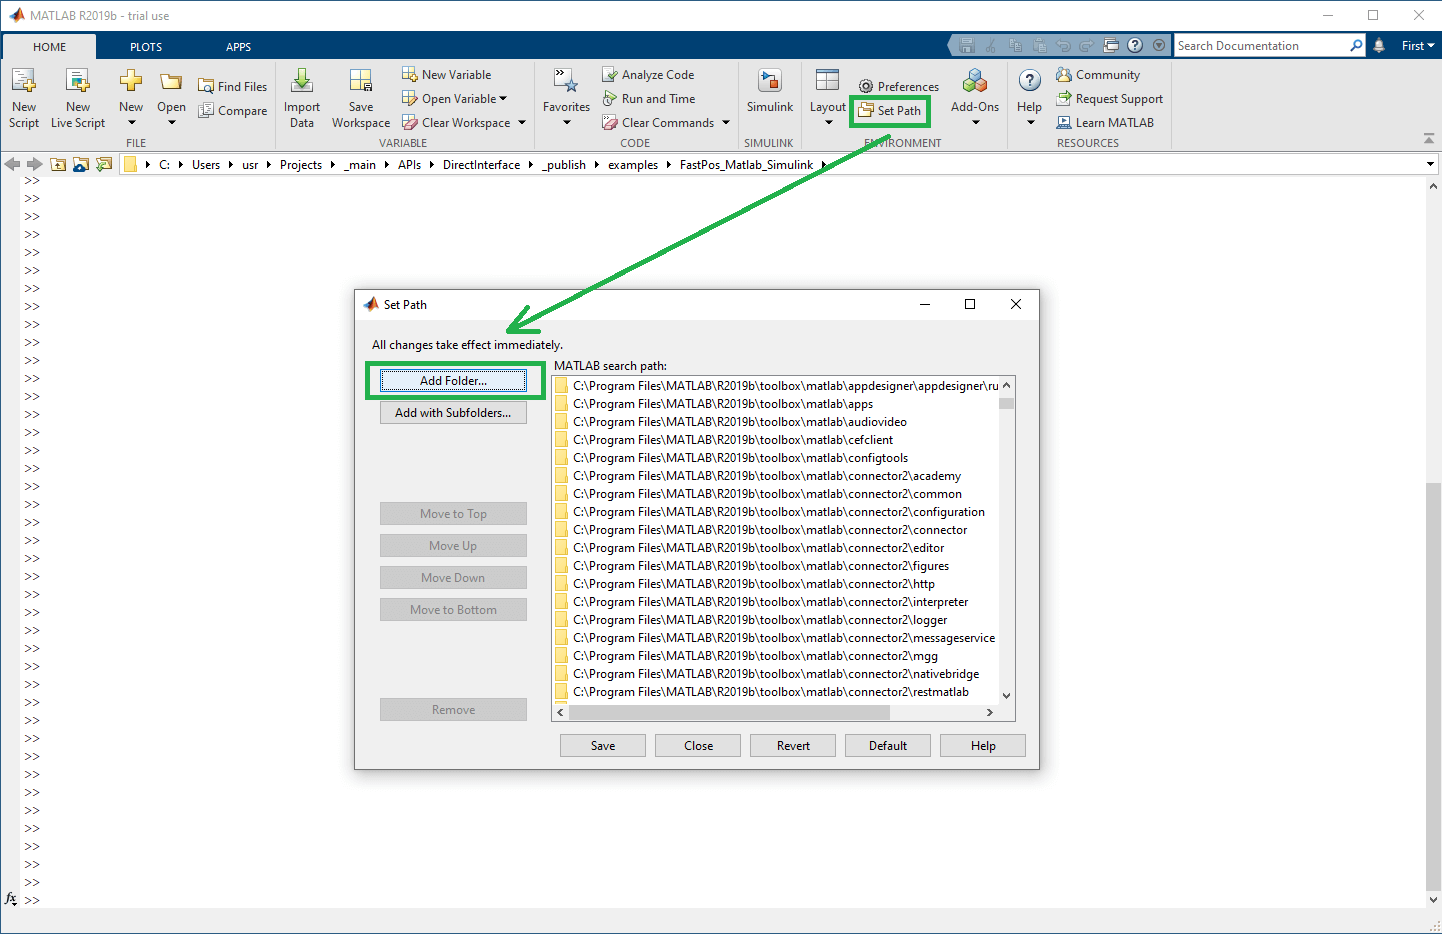
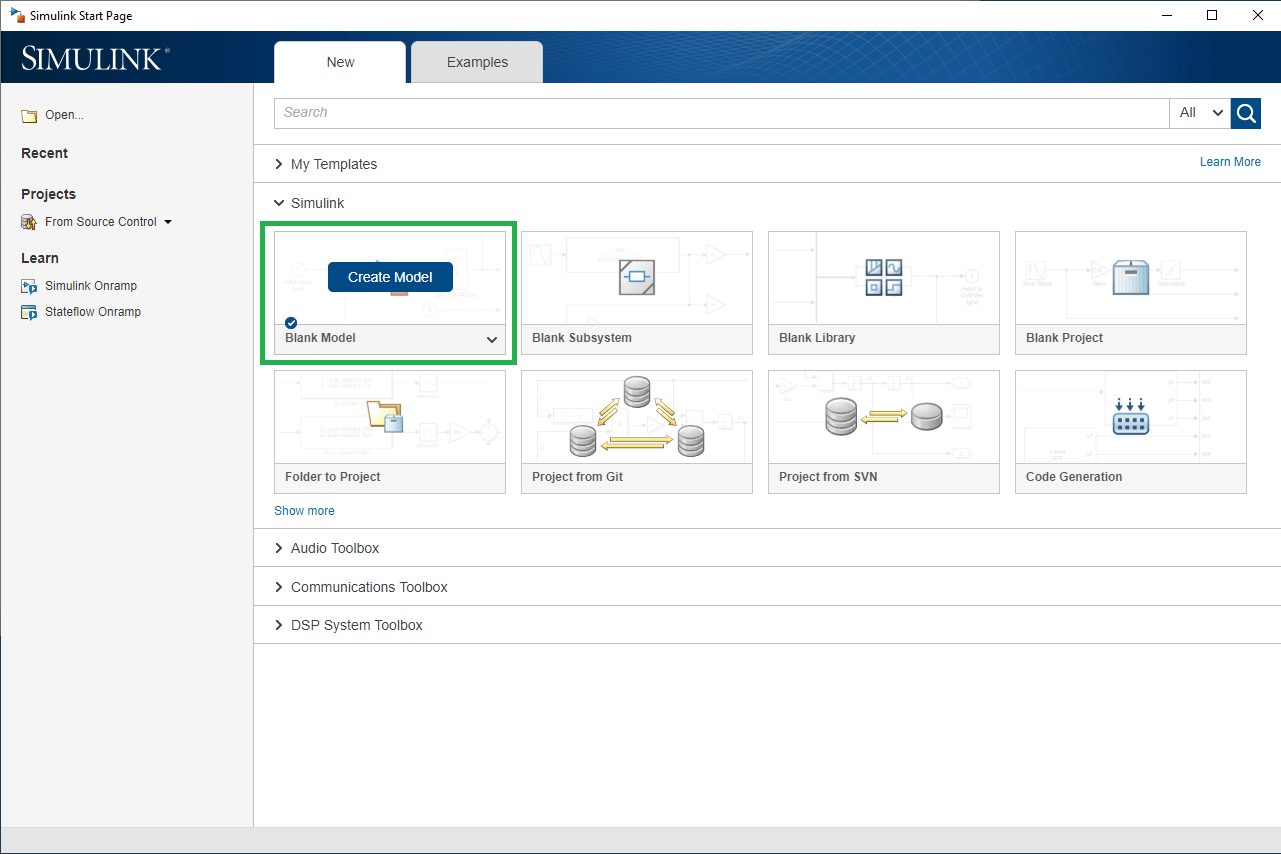
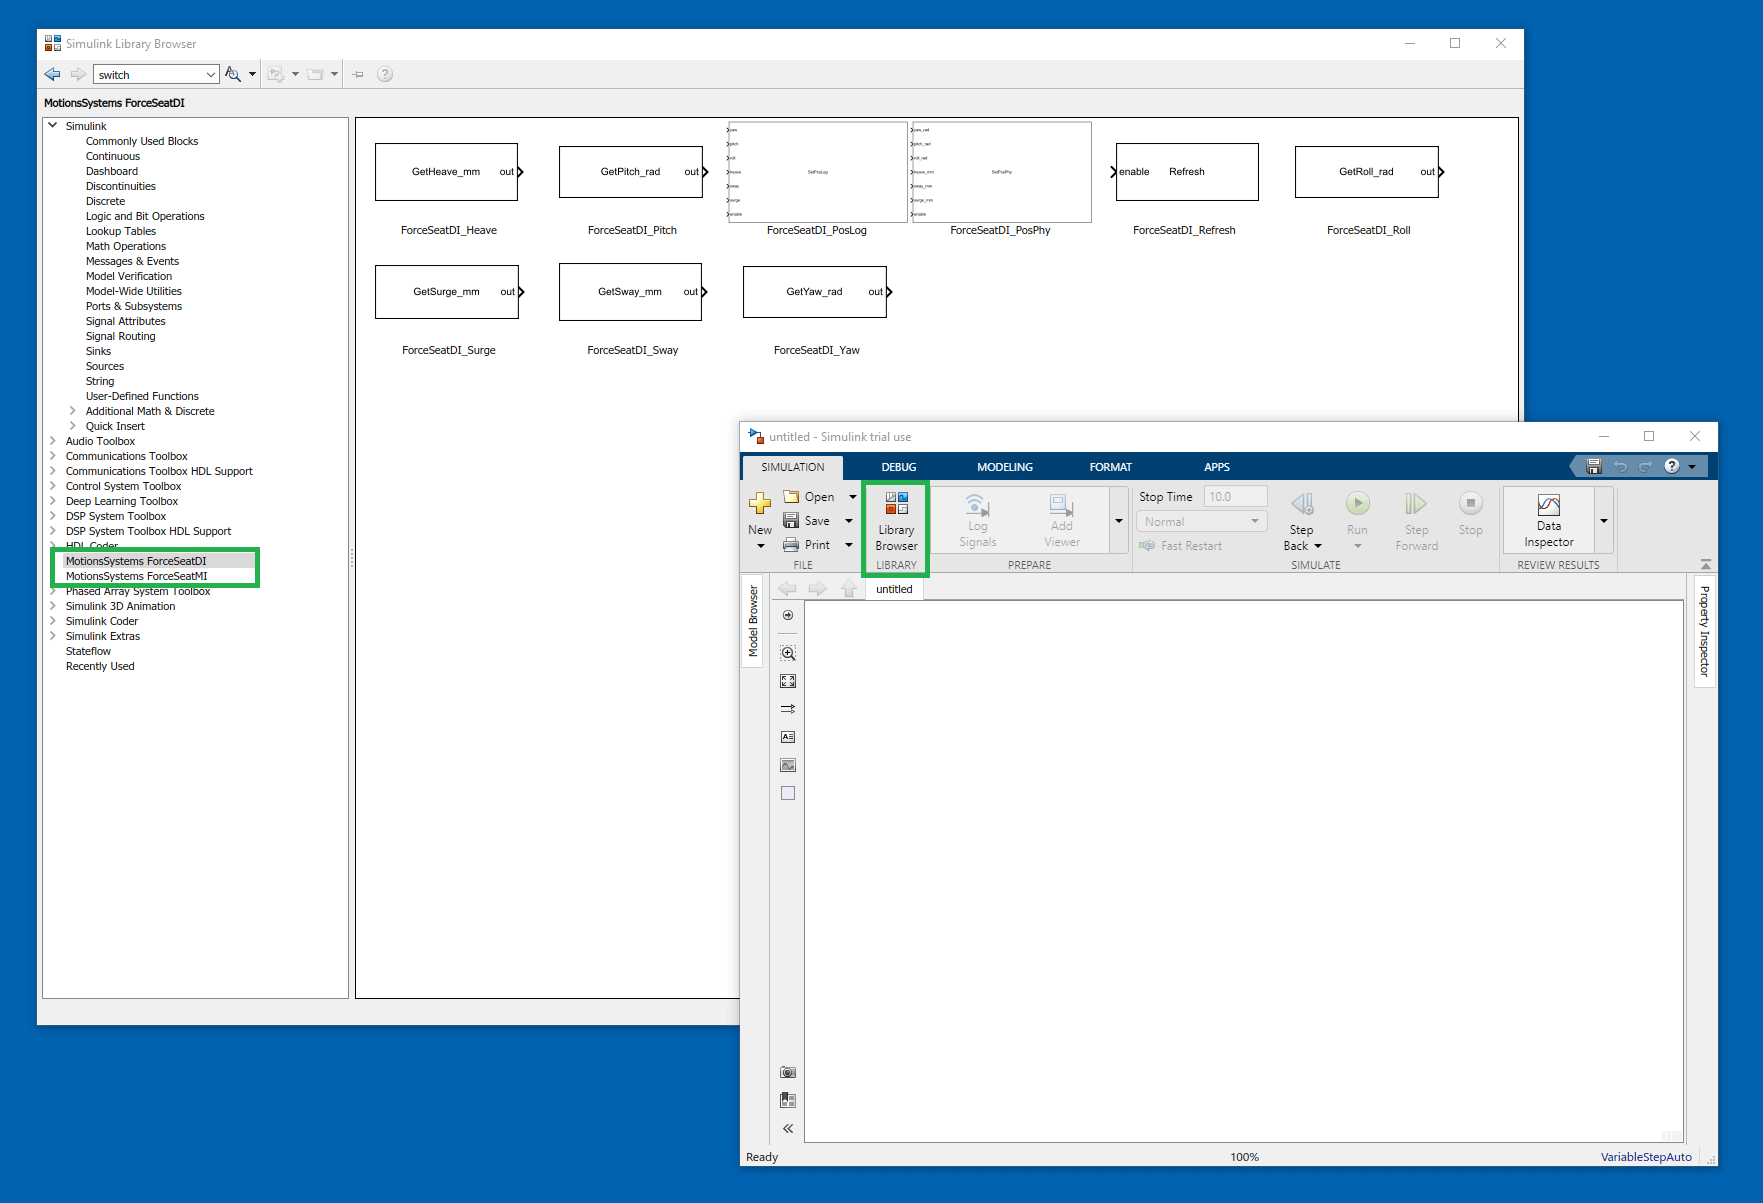
6.4 Importing libraries for an older Matlab® version
6.4.1 ForceSeatMI
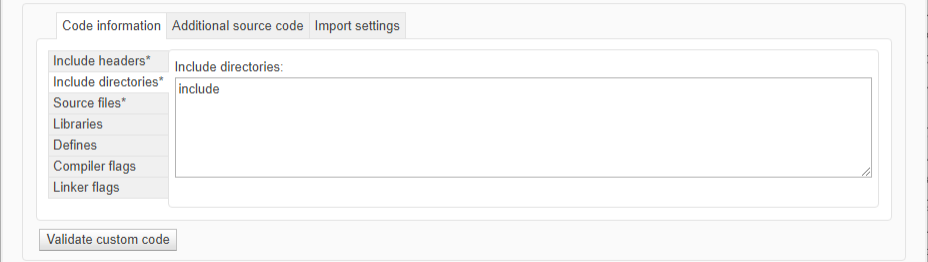
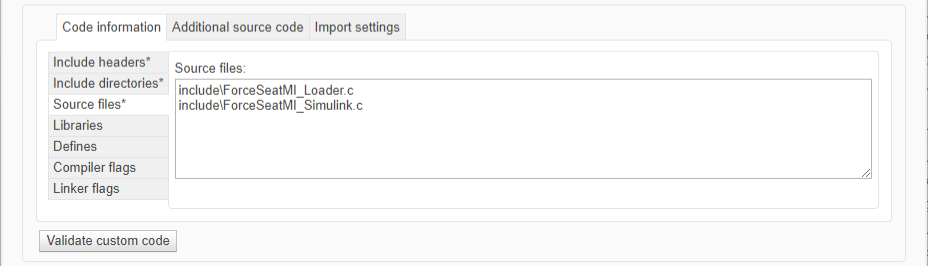
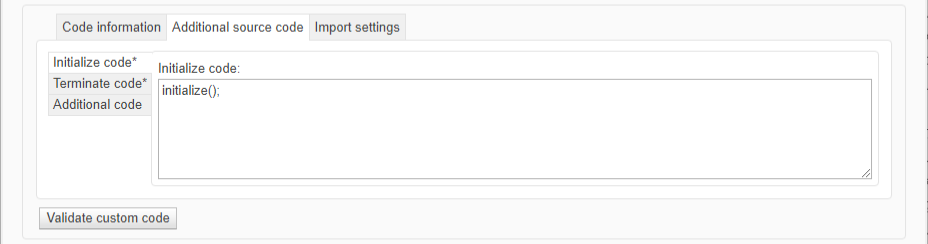
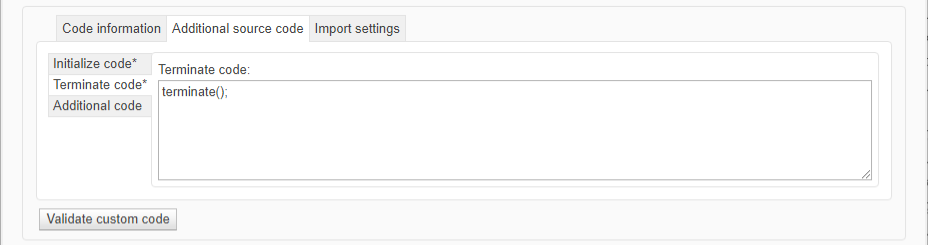
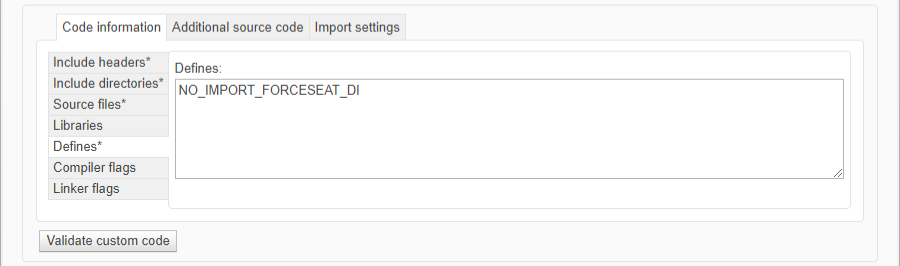
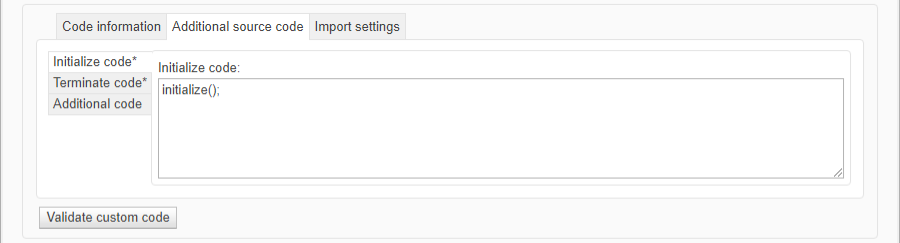
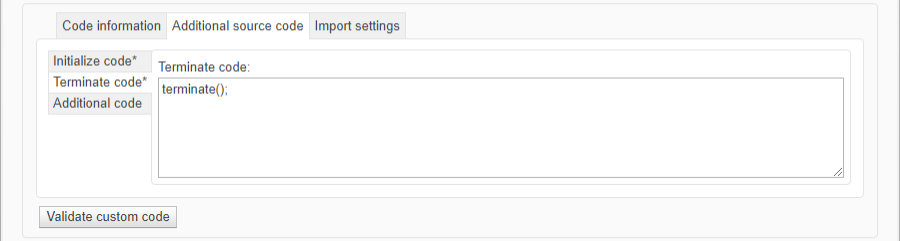
In order to run the ForceSeatMI libraries on older versions of Matlab® (e.g. 2022), proceed with steps described in previous section. Then go to Model Settings → Simulation Target tab → fill in the text fields as in the screenshots below: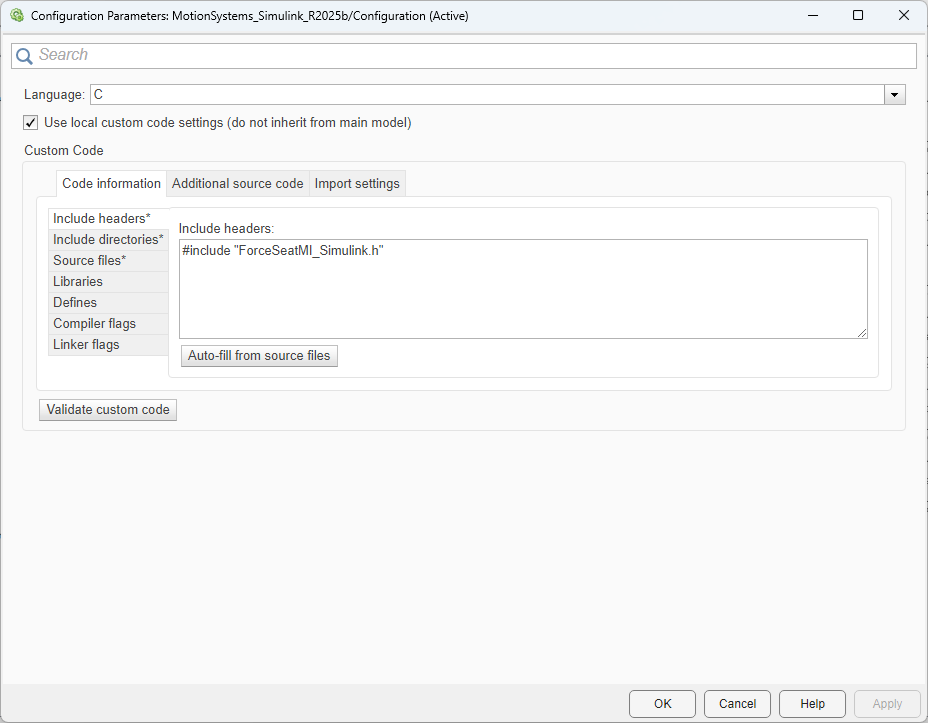
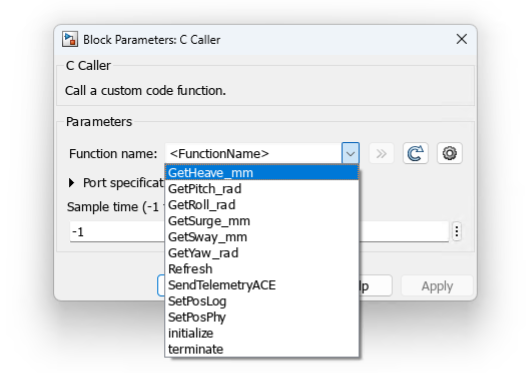
6.4.2 ForceSeatDI
In order to run the ForceSeatDI libraries on older versions of Matlab® (e.g. 2022), proceed with steps described in previous section. Then go to Model Settings → Simulation Target tab → fill in the text fields as in the screenshots below: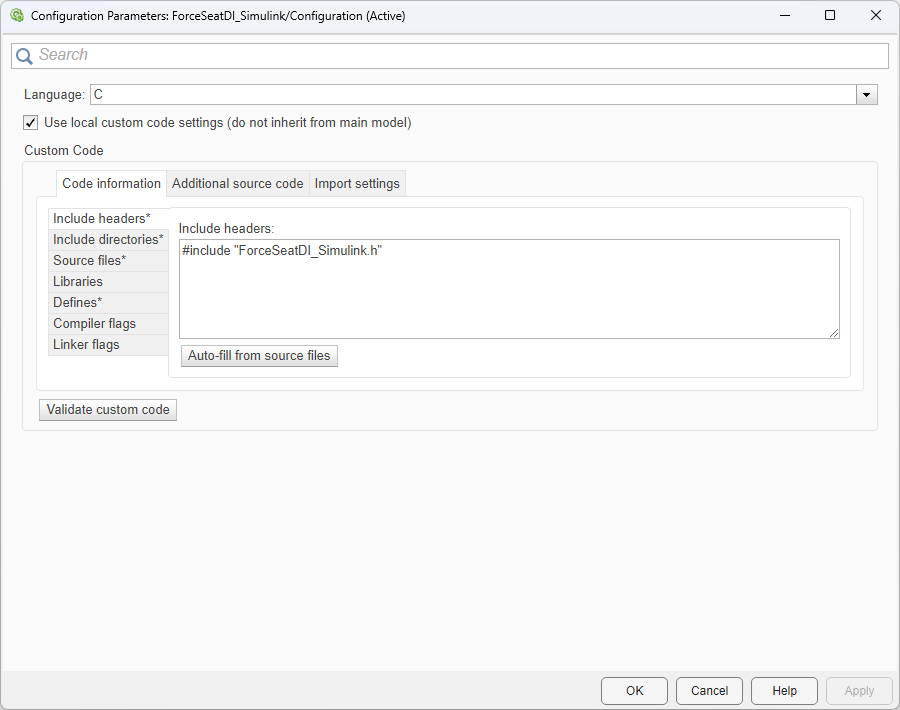
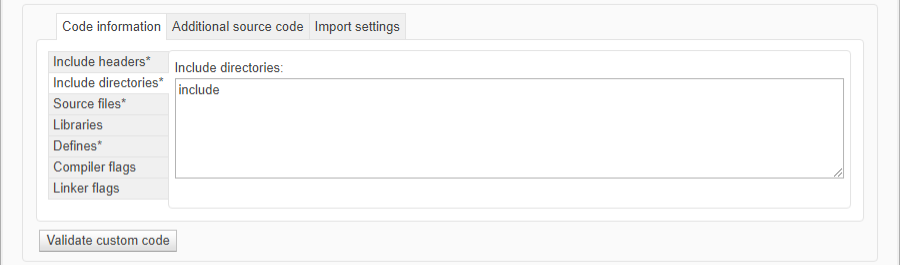
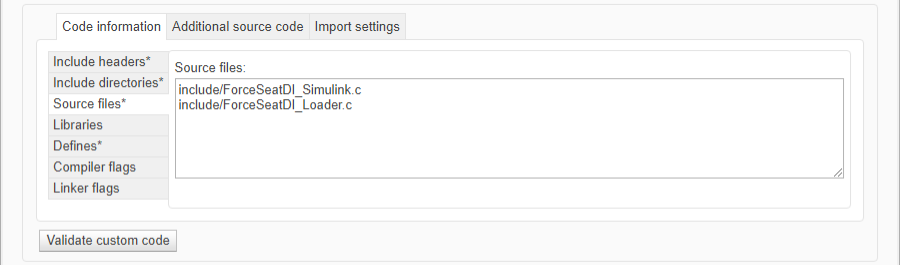
6.5 Compilers
6.5.1 MinGW
MinGW is available via Matlab® add-ons mechanism:- start Matlab®
- go Home, Add-ons and click Get Add-ons
- find and install MinGW
- after installation is finished, MinGW is configured as default compiler for C and C++
7 Wide market applications
7.1 Introduction
By default FoceSeatMI license is bound to specific device. It means that if the application/game is used with different motion platform, then separate license key is required for each motion platform. It is easy to imagine situation where that kind of license policy will be an obstacle. Typical example is a game available in Steam where anybody can buy it. Solution to this problem is AppID mechanism. This document should help you to understand how to obtain AppID, what are requirements and how to implement it.7.2 When can I get AppID?
There are following general requirements:- You have successfully integrated ForceSeatMI in your application/game and the application/game works correctly with at least one of our motion platforms.
- You are ready to publish your application/game in online store (e.g. Steam) so literally everybody can buy it
- You are ready to sell your application/game to specific set of customers but for some reasons (security or military related) you just cannot publish it in typical online store - this kind of cases will required additional verification.
- You are ready to deliver a fully working beta version to us for verification. If you are prohibited to show the full product for some reason, a limited edition can be provided for verification as alternative.
7.3 What kind of AppID categories are available?
There are two AppID categories: for product and for publisher.AppID for product
- This kind of AppID is bound to specific application/game.
- There is a dedicated profile in ForceSeatPM with product related name and icon (image).
- ForceSeatPM automatically detects the application/game installation in the system, configures it (if the application/game requires configuration) and binds the dedicated profile to it.
- The application/game executable name cannot be changed (the name is used during license verification) and it cannot be simple Run.exe.
- If the application/game executable is signed, ForceSeatMI also verifies the signature of the file.
- This kind of AppID is bound to the publisher and can be used in any publisher's application/game.
- There is a SINGLE dedicated profile in ForceSeatPM named after publisher name, e.g. "ACME Products".
- ForceSeatPM does not detect publisher applications/games automatically, users have to activate the "ACME Products" profile before they start the application/game.
- The application/game executable name is not checked.
- The application executable MUST be signed by "code signing certificate" (it can be self-sign-certificate).
- ForceSeatMI verifies the signature of the file, so all publishers applications/products must the same "code signing certificate".
7.4 How to get AppID?
- Finish integration of the standard ForceSeatMI SDK in your application/game
- For Unreal Engine: Disable Activate Profile on Startup is your project settings, in ForceSeatPM plugin section. Otherwise remove all ActivateProfile calls from your code, they are not allowed when AppID is used
- Provide Steam ID to us if the application is available in Steam store.
- Provide beta version of the application for verification - we want to check if it uses the motion platform correctly and implement installation detection in ForceSeatPM.
- If you cannot provide normal version, please provide limited version (proof of concept) of the application so we can check basic functionally (and get.EXE file signature). This applies only to Publisher AppID cases.
- Provide suggested profile name and image (270×100).
- Once we verify the beta version, we will assign the AppID and send it to you.
- For Unreal Engine: Enter AppID is your project settings, in ForceSeatPM plugin section. Otherwise add SetAppID call to your code, rebuild your application/game and send it to us once again.
- We finish integration and double check if everything works correctly.
- Next we send you beta version of the ForceSeatPM so you can verify it on your side.
- Finally when everything is confirmed to work correctly, we publish new ForceSeatPM for end users to download.
8 Reproducing accelerations
8.1 Introduction
If the SIM goal is to reproduce source linear accelerations accurately (1:1), then due to its operation principle telemetry mode cannot be used. Telemetry modes uses classical washout algorithm which utilizes high pass filters internally and in the result it generates sensation of forces to trick human senses and to use motion platform's work envelope efficiently.From https://en.wikipedia.org/wiki/Motion_simulator:
"The classical washout filter is simply a combination of high-pass and low-pass filters; thus, the implementation of the filter is compatibly easy. However, the parameters of these filters have to be empirically determined. The inputs to the classical washout filter are vehicle-specific forces and angular rate. Both of the inputs are expressed in the vehicle-body-fixed frame. Since low-frequency force is dominant in driving the motion base, force is high-pass filtered, and yields the simulator translations. Much the same operation is done for angular rate."
You can find more details in the following document (chapter 2):
https://motionsystems.eu/files/Vehicle_physics_simulation_application.pdf
The solution is to use input linear accelerations to calculate velocity, then displacement and in the result a series of position. Finally top table positioning mode should be used to fit the motion platform with generated trajectory.
It seems that using basic displacement and velocity calculation formulas is sufficient enough to generate a trajectory that reproduces input acceleration:
sn = sn-1 + Vn-1 · dt + an · dt22
Vn = Vn-1 + an * dt
Tip
In order to achieve the highest precision, it is recommend to run the calculation at as high frequency as possible. For instance if the source file contains sample in 0.00001[s] intervals, it is the recommended to use all of them to generate trajectory and then just skip unneeded positions from generated trajectory (not source file) when control messages are being sent to the motion platform in 0.004[s] intervals. Otherwise calculated trajectory might drift away from the center/neutral position and in the result the top table will drift away as well.
static constexpr const int MSG_INTERVAL_MS = 4;for (/*...each sample...*/) ... // Interval between samples might not be constant, so calculate dT each callback call auto dTime_s = 0.000001 * (data->timestamp_us - ctx->previousSampleTimeMark_us); ctx->previousSampleTimeMark_us = data->timestamp_us; ctx->sway.displacement += ctx->sway.velocity * dTime_s + data->accSway * (dTime_s * dTime_s * 0.5f); ctx->surge.displacement += ctx->surge.velocity * dTime_s + data->accSurge * (dTime_s * dTime_s * 0.5f); ctx->heave.displacement += ctx->heave.velocity * dTime_s + data->accHeave * (dTime_s * dTime_s * 0.5f); ctx->sway.velocity += data->accSway * dTime_s; ctx->surge.velocity += data->accSurge * dTime_s; ctx->heave.velocity += data->accHeave * dTime_s; ctx->position->roll = 0; ctx->position->pitch = 0; ctx->position->yaw = 0; ctx->position->sway = ctx->sway.displacement * 1000 /* m to mm */; ctx->position->surge = ctx->surge.displacement * 1000 /* m to mm */; ctx->position->heave = ctx->heave.displacement * 1000 /* m to mm */; // NOTE: Without a washout algorithm, the top table may leave the work area quite quickly // if input data recording was not started when the vehicle was at rest. In other words, // the vehicle's velocities and accelerations should be 0 when input recording begins, // otherwise the pre-existing vehicle velocities and accelerations will be unknown, // and as a result, the top table may drift away from the center. if (data->timestamp_us - ctx->lastMsgTimeMark_us >= 1000 * MSG_INTERVAL_MS) // We want to do math on all samples to achieve higher precision but only send data // to the motion platform every MSG_INTERVAL_MS. ctx->timer.WaitUntil_ms(data->timestamp_us / 1000); ctx->lastMsgTimeMark_us = data->timestamp_us; ForceSeatMI_SendTopTablePosPhy(ctx->api, ctx->position); 8.2 Limitations and concerns
Since the goal is to reproduce the input linear accelerations accurately, then by definition no washout algorithm can be used as it would alter the accelerations. That kind of approach causes a risk of the top table drifting away from the center.8.2.1 Recording from moving vehicle
The table will drift away from the center in almost all cases when recorded data comes from moving vehicle (car, plane, train,...). This is related to the fact that the motion platform's work envelope is in centimeters range where vehicle's range can be kilometers. The recommended solution and basically the only solution for this case, is to sacrifice acceleration reproduction accuracy and use washout algorithm that will keep the top table inside its work envelope. In other words, it is recommend to use telemetry mode and configure high pass filters is ACE module accordingly.Please refer to following document for details (chapter 3):
https://motionsystems.eu/files/Vehicle_physics_simulation_application.pdf
Tip
Due to principle of the operation, the motion platform is not able to reproduce sustained linear acceleration directly and instead tilt coordination should be used. If your recording contains sustained (long term) accelerations, then it is recommend to use ACE and benefits of classical washout algorithm.
8.2.2 Low precision/low sampling rate of the input data
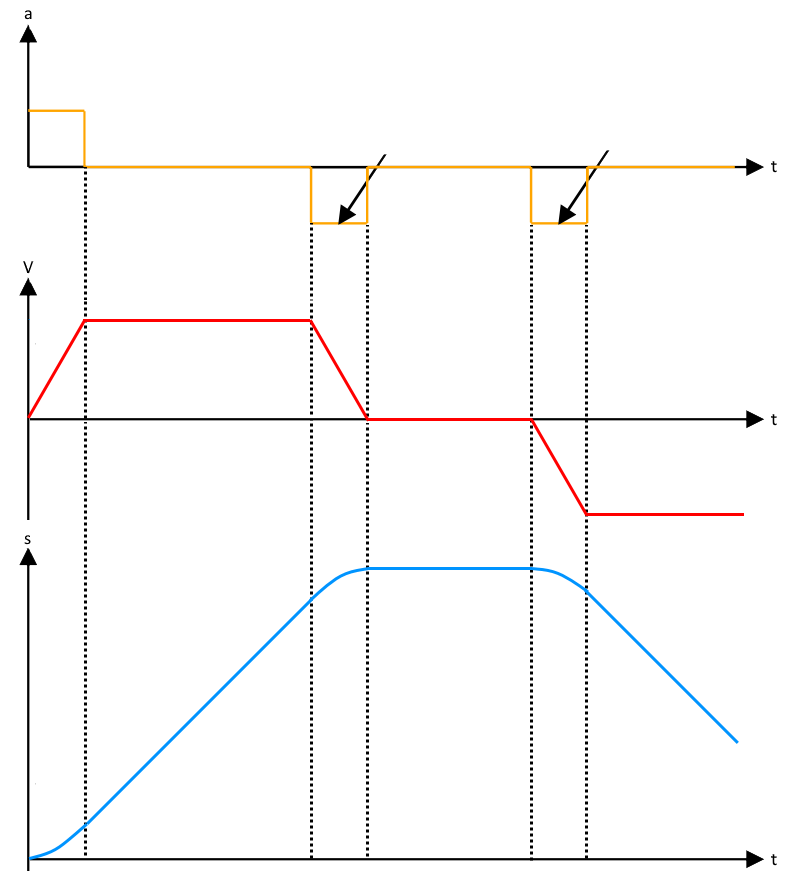
When you are replaying accelerations stored in CSV file, low precision of the input data and/or low sampling rate of the input data might case drifting issue. Typical scenario is when there are peaks in acceleration (e.g. when your object hits something) and not of them are present in the CSV file. Below is simple example that shows what happens to accumulated velocity when one positive acceleration peak is missing. If there are more instances of this in the sample file, the top table will drift even further away from the center.